Quantcast
Channel: Task Router – Twilio Cloud Communications Blog
Viewing all 10 articles
Browse latest View live

Building A Multi Channel Support Desk with TaskRouter

$
0
0

We live in a time where there are more ways than ever for businesses and their customers to connect. As developers, we have the opportunity to build applications that help facilitate these connections. But if you’ve built a support desk before, you know that writing the code that manages agent availability and integrates multiple channels of communication can be complicated. Twilio built TaskRouter to help make building this type of functionality in your applications a bit easier.

In this post, we’ll show you specifically how to use the Twilio TaskRouter to build a support desk application that initially allows customers to contact you via phone. We’ll walk you through enhancing that application to scale to multiple agents and then add SMS as a second communication channel, routing each customer to the best agent for them.

Before we start coding, be sure to pull up the companion GitHub repository with every step pre-built and tagged. You can also deploy our example support desk using this Heroku Deploy button below.

Heroku deploy button

Our Tools

Let’s take a quick look at the collection of tools we’ll be using to build our support desk:

Sign up for a Twilio account and we’ll get started coding.

Setting The Stage

As we mentioned, we’ll be building our support desk as a Flask application. This will provide a nimble foundation that we can iterate on throughout this post. Let’s start by getting Flask set up.

A best practice when working with Python is to isolate each application’s dependencies from the other projects using virtualenv. Virtualenv installation depends on your operating system, so here are guides for Windows, Mac OS X and Ubuntu Linux users.

Create a new virtualenv to separate your Python dependencies from other apps you’re working on with the following command. Virtualenv will create a directory for you with an isolated Python interpreter that’s clean of extraneous libraries and dependencies.

virtualenv supportdesk

Be sure to activate the virtualenv before we install the dependencies.

source supportdesk/bin/activate

The dependencies we need for this project are the Twilio helper library and Flask. To install them run the following pip command on the command line. If you need to install pip, here are a few more specific installation guides for Windows, Mac OS X and Linux.

pip install twilio flask

Now your environment is ready to execute Python code that relies on Flask and the Twilio helper library, so let’s write the code to make that work. There is also a tagged GitHub repository available with this code in case you don’t want to type it all in. Let’s get started by creating a new file named

app.py
. At the top of our new file add the following imports.

import os
from flask import Flask, Response
from twilio import twiml

In the above code we obtain os to pull in environment variables, Flask library for our web application and the Twilio helper library for TwiML which we’ll use to respond to incoming Twilio HTTP POST webhooks.

After our import code add three new lines to obtain the necessary environment variables. Two of the three variables we need are the Twilio Account SID and Auth Token, which can both be found on the Account Portal. The third environment variable is the support agent number. In this post, you can play the role of the support agent as we’re building the application. As the support agent, you’ll need to fill in your cell phone number for the

SUPPORT_AGENT_NUMBER
with the “+12025551234” format.

ACCOUNT_SID = os.environ.get('TWILIO_ACCOUNT_SID', '')
AUTH_TOKEN = os.environ.get('TWILIO_AUTH_TOKEN', '')
SUPPORT_AGENT_NUMBER = os.environ.get('SUPPORT_AGENT_NUMBER', '')

Next we create the Flask application and add a simple route for ‘/’ so we can ensure the app is running properly.

app = Flask(__name__)

@app.route('/')
def working():
    return "Service desk up and running!"

Finally let’s add a main function so the application runs on a port specified in an environment variable or defaults to 5000.

if __name__ == '__main__':
    # first attempt to get the PORT environment variable, 
    # otherwise default to port 5000
    port = int(os.environ.get("PORT", 5000))
    if port == 5000:
        app.debug = True
    app.run(host='0.0.0.0', port=port)

Save the file and we can run the Flask application using the following command.

python app.py

The Flask server should display the following message if it starts up successfully through the above command.

* Running on http://127.0.0.1:5000/

We can now confirm our simple Flask app is running by going to http://127.0.0.1:5000 in a web browser. If the application is running successfully you should see the simple success message, “Support desk up and running!”.

However, we haven’t yet added any support desk functionality. Let’s write some code for that now. Stop the Flask server with

CTRL-C
and open the
app.py
file back up.

Initially our support desk is going to be extremely basic. We’ll add a single route (

/call
) that Twilio can POST to when a call comes into our application. Whenever anyone calls our number we’ll forward their call (using the <Dial> verb) to a single agent, Ender. Remember, you’ll be playing the role of Ender, so make sure to put your phone number into the
SUPPORT_AGENT_NUMBER
environment variable so your phone will ring whenever there’s a support call. In this function we’re using the Twilio Python helper library to generate our TwiML.

Write the /call function as shown below highlighted between our previous app.py code. If you don’t want to have to write all the code, the tutorial-step-2 tag of our Git repo contains all the code up to this point including this new

/call
function.

@app.route('/')
def working():
    return "Service desk up and running!"

@app.route('/call', methods=['GET', 'POST'])
def call():
    r = twiml.Response()
    r.dial(SUPPORT_AGENT_NUMBER)
    return Response(str(r), content_type='application/xml')

if __name__ == '__main__':
    # first attempt to get the PORT environment variable, 
    # otherwise default to port 5000
    port = int(os.environ.get("PORT", 5000))
    if port == 5000:
        app.debug = True
    app.run(host='0.0.0.0', port=port)

In order for Twilio to access our application and the critical

/call
route, it needs to be exposed someplace publicly. For development purposes we can run
app.py
locally and use a tool like Ngrok to tunnel our localhost to the outside world.

The reason why a localhost tunnel is necessary is that your development machine is likely behind a router that won’t allow direct inbound connections to your Flask application. We can get around this localhost issue with a localhost tunnel service, one of which is Ngrok. Sign up for Ngrok, download the Ngrok tunnel application and install it on your development machine.

Fire up Ngrok on port 5000 where our Flask application is running with the following command. See this configuring Ngrok post if you’re running Windows. On Linux and Mac OS X Ngrok can be run with the following command when you’re in the directory that Ngrok is located in.

./ngrok 5000

Ngrok will load up a screen like the one in the following screenshot. Take note of the unique https:// forwarding URL as we’ll need that again in a minute to configure our Twilio number’s incoming message handling URL.

The Flask application running on port 5000 can now be accessed through the forwarding URL set up by Ngrok.

We’re now ready to set up the Twilio number. Head back to the Twilio web page and press the “Setup number” button for the number you purchased. A configuration page with default values for voice and messaging will come up and look like the following screen.

Now that the application is working properly we can take the Ngrok URL plus the

/call
route and paste it into our Twilio Request URL as shown in the following screenshot:

Give your Twilio number a call and you’ll notice that we’re ringing our one support desk agent, Ender (who just happens to be borrowing your cell phone). Wow, I feel sorry for Ender. He’s going to get overloaded almost immediately. Not only is he having to handle every single incoming call but he has to answer them at exact moment they come in. Since Ender can’t control when calls come to him he can’t even step away for lunch without being interrupted. He probably can’t even go to sleep!

We should enhance our application to give Ender a break. It may even be time for us to hire more than one agent. In the rest of this post we’ll show you how to upgrade your support desk using TaskRouter to make life better for both Ender and your customers.

Meet TaskRouter

Ender is really hungry, he hasn’t been able to take a lunch break for days. Don’t worry Ender – once we implement TaskRouter we’ll have the ability to know when you or any other agents are available and only pass along tasks to those who are. If our support desk has multiple agents, TaskRouter can direct each task to the best person or process. But before we get too far ahead of ourselves let’s walk through getting TaskRouter set up.

To access TaskRouter functionality, select “TaskRouter” from the dropdown as shown in the upper left hand corner of the Twilio account portal.

Selecting TaskRouter brings us to the “Getting Started” page with some basic instructions about setting up an application. The functionality for setting up our TaskRouter application is under the “Manage” item within the top menu bar.

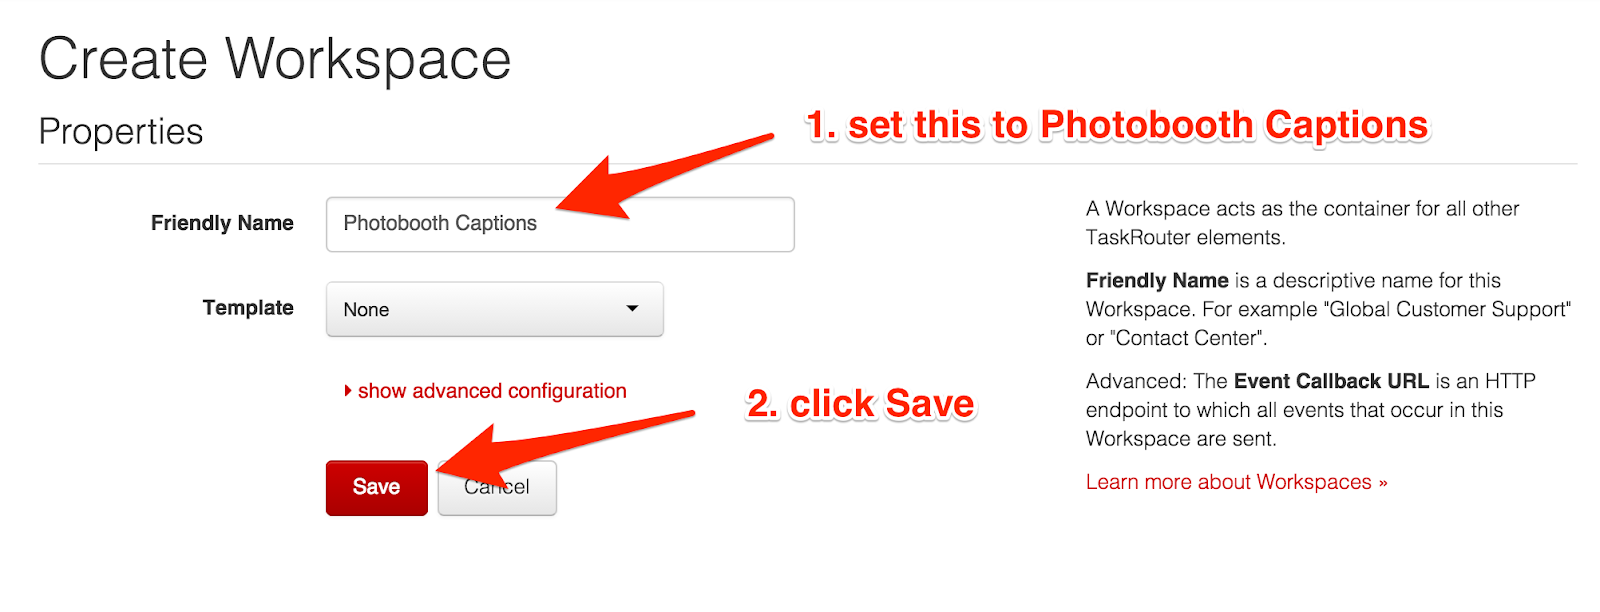
Let’s start our TaskRouter application by creating a “Workspace”. A Workspace is the root of a TaskRouter application. It acts as a container for all other TaskRouter elements. We can call our workspace: “My Excellent Support Desk”. Make sure to select “First In, First Out” as the Template.  This sets up a default Workflow which we can take advantage of in a few minutes.

Once we hit the “Save” button our Workspace will be created and further information about it will be displayed like what we see in the following screen. Take note of the Workspace SID as we’ll use that in our code throughout this post to reference the Workspace we’re creating.

Next click the “Workers” tab so we can create a record for our first support desk agent Ender.

Workers represent people like our wonderful agent Ender or processes that can handle tasks. Let’s define Ender as a TaskRouter Worker because he’s our first support desk agent.

Click the “Create Worker” button. When the page loads up, fill in Ender’s information. The Friendly Name should of course be “Ender”, Activity set to “Idle” and Attributes with the following JSON. Make sure to replace the phone_number with your cell phone number if you want the calls to come to you for testing.

{"training":["voice"], "phone_number":"+12025551234"}

This JSON lets TaskRouter know the skills and attributes of our Worker. Your screen should look like the following and then it’s ready for you to press the “Save” button.

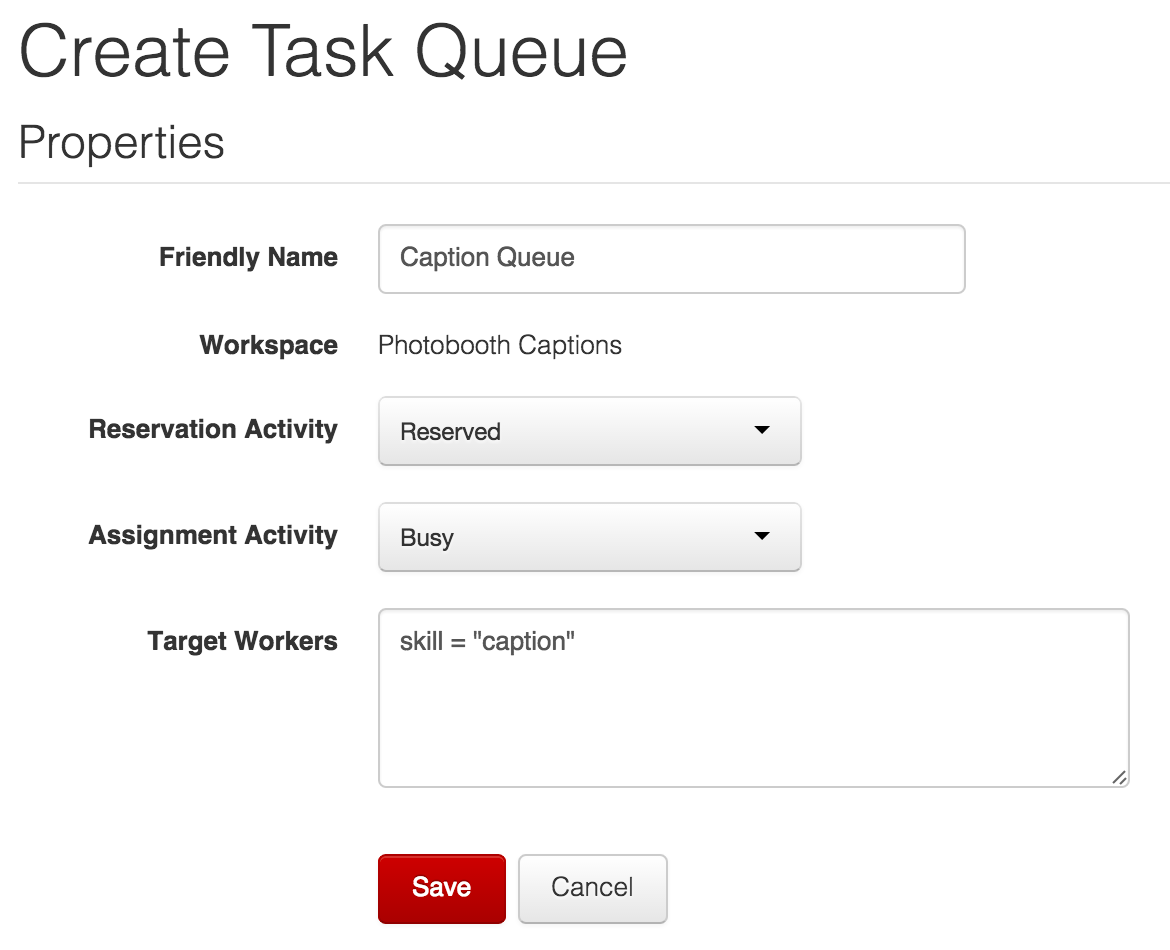
Now that we have Workers, we’ll create a new Task Queue. I bet you can guess what Task Queues do… they queue our tasks based on priority and match them to workers with appropriate attributes. Let’s create a new Task Queue called “Technical Phone Support”. There are few things we set here. The Reservation and Assignment Activity options let you tell TaskRouter which Activity a Worker should enter when they are reserved and assigned. The Target Workers option is a SQL-like query that lets us only assign Tasks in this Task Queue to workers with certain attributes. For this Task Queue, we only want to assign to workers that have been trained to handle voice tasks:

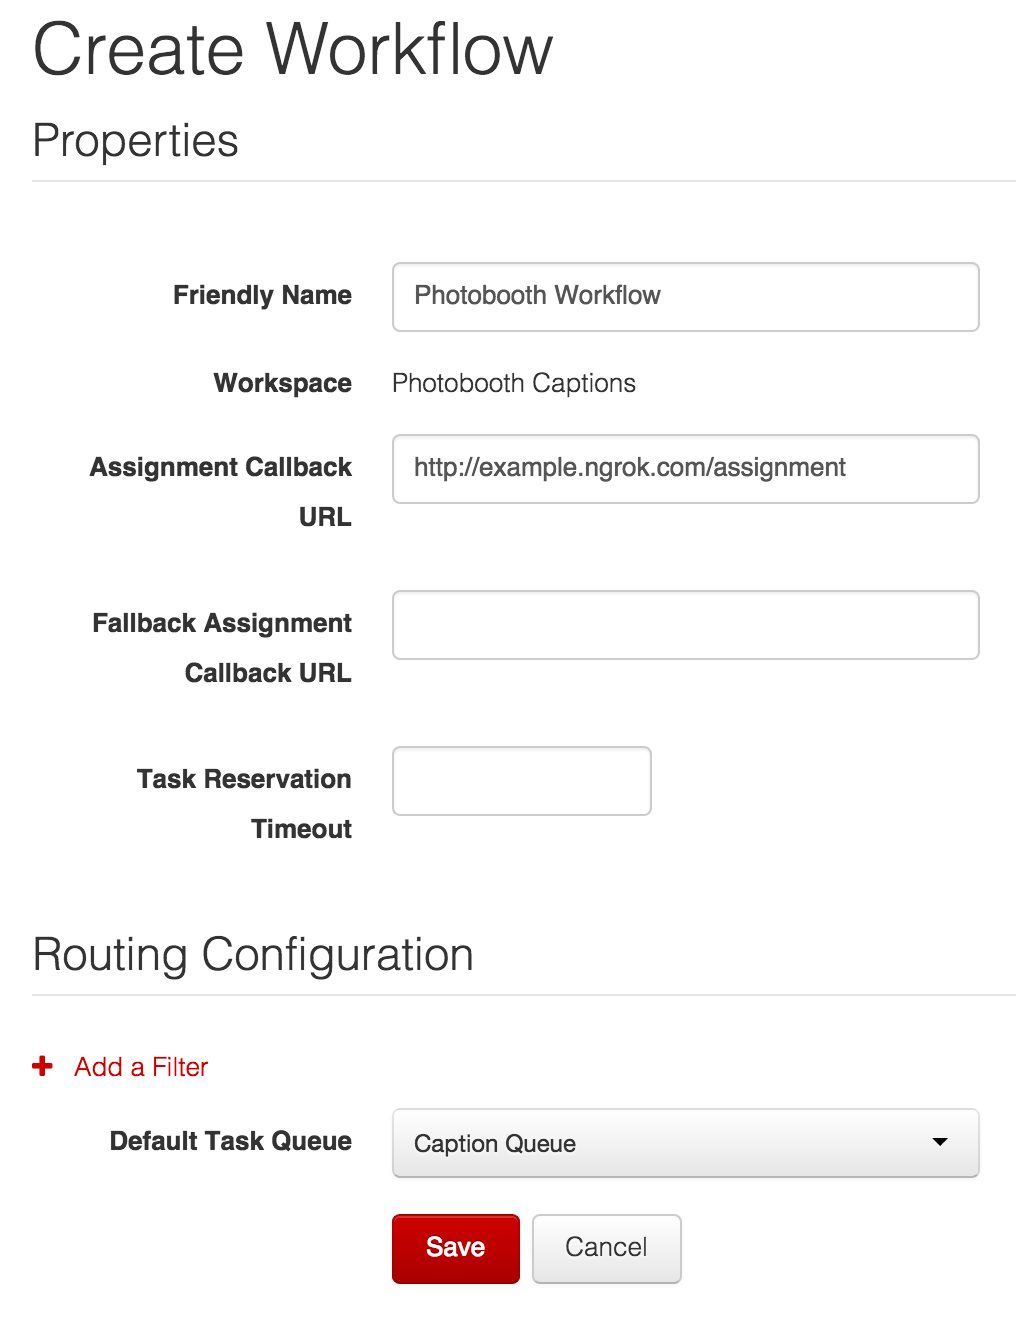
The next part of our TaskRouter app is a Workflow. Workflows examine tasks as they come in and make sure they’re assigned to the appropriate Task Queues. We’ll update the “Default Fifo Workflow” by clicking over to the Workflows tab and selecting the Workflow that was created as part of our Workspace.

In the Workflow configuration screen set the Assignment Callback URL to

[our-ngrok-forwarding-url]/assign
. We haven’t written the
/assign
route yet but don’t worry we’ll write that in the next section of this post:

There are only two parts of our TaskRouter application we haven’t looked at yet – Tasks and Activities. Tasks are unique actions we need our agents to address – which in our case will be  phone calls and SMS messages. We’ll be creating Tasks programmatically as phone calls or SMS messages come into our app.

Activities represent the state of a Worker. By default, TaskRouter creates four common default Activities for you: Offline, Idle, Busy and Reserved. These are all we’ll need for our support desk. If Ender decides to grab lunch we can make sure his state is Offline so he doesn’t keep getting calls.

Great news! We’ve just hired our second support desk agent, Petra. If you don’t have a second phone sitting around to test with, you can quickly deploy a new instance of Twilio Client from this github repo. Let’s add Petra as a new Worker in our TaskRouter application. Set Petra’s Attributes to a similar JSON string as Ender but with a different phone number.

{"training":["voice"], "phone_number":"+12025556789"}

Support Desk 2.0

We’re now ready to update our support desk to v2.0. We’ll update our Flask application to not just call Ender whenever a call comes in but instead let TaskRouter intelligently route that call to either Ender or Petra depending on who is available. I can only imagine how excited Ender is.

To get v2.0 up and running we need to update the code in

app.py
file starting with a couple extra imports.

import json
import os
from flask import Flask, Response
from flask import request
from twilio import twiml

Our

app.py
file now needs a new environment variable for the Workspace SID and Workflow SID for our TaskRouter application. We can also replace the
SUPPORT_AGENT_NUMBER
environment variable with a new
SUPPORT_DESK_NUMBER
that will be our main support desk call in number instead of using Ender’s phone number. The
SUPPORT_DESK_NUMBER
will be the Twilio number we use for our support desk:

ACCOUNT_SID = os.environ.get('TWILIO_ACCOUNT_SID', '')
AUTH_TOKEN = os.environ.get('TWILIO_AUTH_TOKEN', '')
SUPPORT_DESK_NUMBER = os.environ.get('SUPPORT_DESK_NUMBER', '')
WORKSPACE_SID = os.environ.get('WORKSPACE_SID', '')
WORKFLOW_SID = os.environ.get('WORKFLOW_SID', '')

We also need to make a change to our /call route.  Instead of using the <Dial> verb, we’ll now use the <Enqueue> verb. This will allow us to pass the call to a TaskRouter Workflow in order to place the call into the appropriate TaskQueue.

@app.route('/call', methods=['GET', 'POST'])
def call():
    r = twiml.Response()
    r.enqueue('', workflowSid=WORKFLOW_SID)
    return Response(str(r), content_type='application/xml')

The previous code will handle passing our call to our Workflow. Remember when we created our Workflow we set the Assignment Callback URL to the

/assign
route? Let’s create that route so our Workflow can function properly:

@app.route('/assign', methods=['POST'])
def assign():
    number = json.loads(request.form['WorkerAttributes'])['phone_number']
    instruction = {
        "instruction": "dequeue",
        "to": number,
        "from": SUPPORT_DESK_NUMBER
    }
    return Response(json.dumps(instruction), content_type='application/json')

Whenever a Worker is available for one of our Tasks, Twilio will make a POST request to the Assignment Callback URL. The POST request will include data about the assignment, including the Worker attributes we defined for that worker. We’ll pull the Worker’s phone number so we know who to place the call to.

We respond to the POST request from Twilio and acknowledge the assignment by passing back some JSON instructions of what to do with this Task next. In this case, we’re using the special dequeue instruction which will handle calling the to number and connecting to our agent for us.

We can now test our new application workflow. Let’s give our number a call now and see what happens. You’ll notice a new task has been added to our tasks:

The status of one of our workers has changed as well. Petra is now handling the voice call!

As we hire new workers, TaskRouter will automatically handle making sure calls make it to the appropriate agent (based on skills and availability) at the appropriate time. Speaking of workers, has anyone heard from Ender? He’s been on his lunch break forever!

Adding SMS Request Handling

Business is booming at Our Excellent Support Desk! We just hired another agent! Meet Bean, Bean is 19, hip to all the jive kids are talking these days and a really fast texter. Bean can also handle phone calls so let’s create a new TaskRouter worker for Bean and give him both the “sms” and “voice” training attributes with the following JSON.

{"training":["voice", "sms"], "phone_number":"+14155554567"}

Giving Bean training on “sms” doesn’t mean he’ll automatically get SMS tasks. We still have to create a new Task Queue for inbound messages and configure our Workflow handle routing those messages:

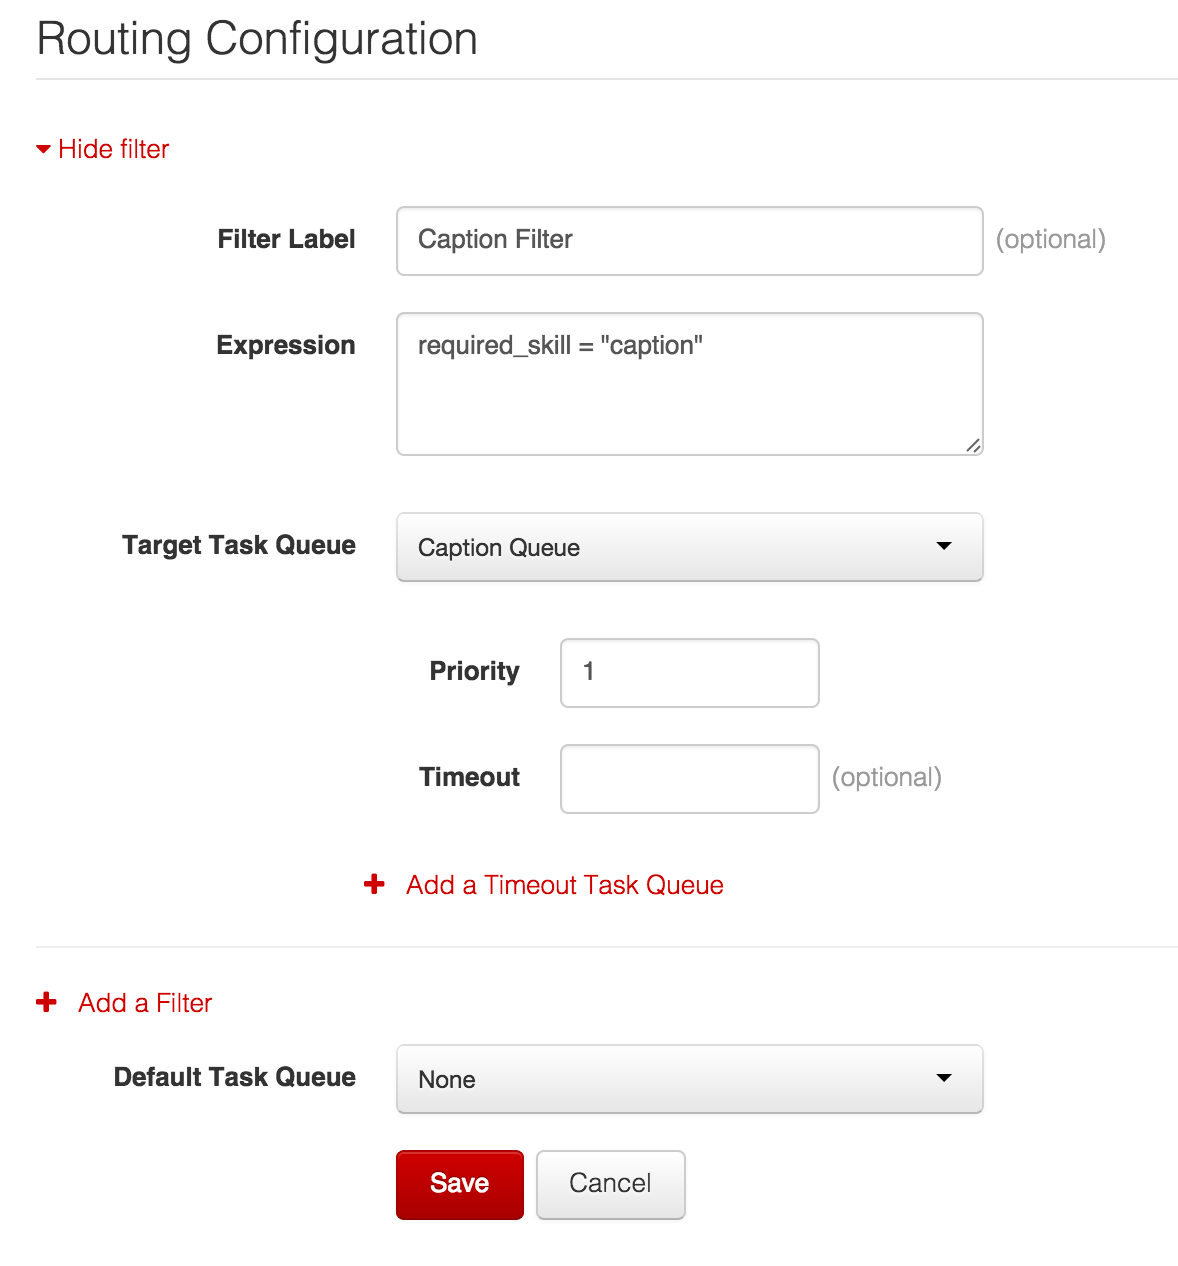
We also need to update our Workflow to include the new task queue. Open up our “Default Fifo Workflow”, scroll down to Routing Configuration and click “Add Filter”. We need two filters, one named Inbound SMS and the other called Inbound Calls. Inbound SMS will have a higher priority than Inbound Calls so that Bean is assigned to SMS first and will only be assigned calls if there are no inbound SMS to handle at that moment.

Priority is set to 1 for Inbound SMS and 0 for Inbound Calls. Priority must be either zero or a positive integer. Higher numbers indicate higher priority.

In order to handle text messages, we’ll need to add another route to our Flask app up to handle incoming messages, let’s call it /message:

@app.route('/message', methods=['POST'])
def message():
    r = twiml.Response()
    r.message("Thanks. You'll hear back from us soon.")
    return Response(str(r), content_type='application/xml')

Let’s make sure our support desk number is configured for incoming messages by copying the Ngrok Forwarding URL plus /message into the Messaging Request URL.

Right now we’re just responding to an incoming message but we need to add the code that creates a task when this message comes in. With voice calls, we added tasks using TwiML. For SMS, let’s add tasks using the TaskRouter REST API via the Python helper library. First we need to import the TwilioTaskRouterClient, the new client for working with TaskRouter.

import json
import os
from flask import Flask, Response
from flask import request
from twilio import twiml
from twilio.rest import TwilioRestClient, TwilioTaskRouterClient

ACCOUNT_SID = os.environ.get('TWILIO_ACCOUNT_SID', '')
AUTH_TOKEN = os.environ.get('TWILIO_AUTH_TOKEN', '')
SUPPORT_DESK_NUMBER = os.environ.get('SUPPORT_DESK_NUMBER', '')
WORKSPACE_SID = os.environ.get('WORKSPACE_SID', '')
WORKFLOW_SID = os.environ.get('WORKFLOW_SID', '')

client = TwilioRestClient(account=ACCOUNT_SID, token=AUTH_TOKEN)
tr_client = TwilioTaskRouterClient(account=ACCOUNT_SID, token=AUTH_TOKEN)
app = Flask(__name__)

Now we can use our TaskRouterClient to create a new task programmatically. We want to make sure our task has all the attributes it needs to be able to be addressed by Bean. These attributes are a phone number (so he knows who to contact) and the body of the message (so he knows what the person is asking about):

@app.route('/message', methods=['POST'])
def message():
    task_attributes = {
        "training" : "sms",
        "phone_number" : request.form['From'],
        "body": request.form['Body']
    }
    tasks = tr_client.tasks(WORKSPACE_SID).create(json.dumps(task_attributes),
                                                  WORKFLOW_SID)
    r = twiml.Response()
    r.message("Thanks. You'll hear back from us soon.")
    return Response(str(r), content_type='application/xml')

We need to update our

/assign
route to make sure our Workflow properly supports SMS. We’ll look at the
training
attribute we set when we created our tasks to see if it’s an SMS message. If it is, we’ll use Twilio to forward the question to whatever agent is assigned with the task:

@app.route('/assign', methods=['POST'])
def assign():
    task_attrs = json.loads(request.form['TaskAttributes'])
    if 'training' in task_attrs and task_attrs['training'] == 'sms':
        number = json.loads(request.form['WorkerAttributes'])['phone_number']
        instruction = {"instruction": "accept"}
        client.messages.create(from_=SUPPORT_DESK_NUMBER, to=number,
            body='Text {0} asking "{1}"'.format(task_attrs['phone_number'],
                                                task_attrs['body']))
        return Response(json.dumps(instruction),
                        content_type='application/json')
    # defaults to voice call
    number = json.loads(request.form['WorkerAttributes'])['phone_number']
    instruction = {
        "instruction": "dequeue",
        "to": number,
        "from": SUPPORT_DESK_NUMBER
    }
    return Response(json.dumps(instruction), content_type='application/json')

When a Worker is supporting customers on a phone call, we know that they’re available again after the phone call ends. For an SMS, we need a mechanism to let Bean (or any other agent) tell us that they’ve completed a task. If we were going super low-fi the agent could update their status directly in the TaskRouter dashboard but that’s not how we roll at our excellent support desk. Let’s add code to our /message endpoint that detects when one of our worker texts in the word ‘DONE’ and closes out the tasks for us:

@app.route('/message', methods=['POST'])
def message():
    # check if one of our workers is completing a task
    if request.form['Body'] == 'DONE':
        from_number = request.form['From']
        for w in tr_client.workers(WORKSPACE_SID).list():
            if from_number == json.loads(w.attributes)['phone_number']:
                # update worker status back to idle
                for activity in tr_client.activities(WORKSPACE_SID).list():
                    if activity.friendly_name == 'Idle':
                        w.update(activity_sid=activity.sid)
                        break
                r = twiml.Response()
                r.message("Ticket closed.")
                return Response(str(r), content_type='application/xml')
    task_attributes = {
        "training" : "sms",
        "phone_number" : request.form['From'],
        "body": request.form['Body']
    }
    tasks = tr_client.tasks(WORKSPACE_SID).create(json.dumps(task_attributes),
                                                  WORKFLOW_SID)
    r = twiml.Response()
    r.message("Thanks. You'll hear back from us soon.")
    return Response(str(r), content_type='application/xml')

Try giving your support desk number one more call or text message and see everything in action.

Wrapping It Up

A lot has changed for our support desk in just a day. This morning Ender looked like this. But look around at all our agents now. Bean’s desk is covered in empty bags of Doritos as he’s excitedly responding to these new fangled text messages from customers. Petra and Ender are exchanging a high five as Ender finally returns from lunch. Most importantly, our customers are happy. With TaskRouter we’ve created an intelligent application that allows us to segment inbound customer communication and connect customers with the right agent at the right time.

What’s next? You can add every inbound channel your customers want to communicate with you on using the blueprint we created today: Email, Facebook, Google Forms, Slack, HipChat. How are you going to use TaskRouter to make your code and business more efficient? Let us know in the comments or holler at us on twitter (@mattmakai or  @rickyrobinett).

Building A Multi Channel Support Desk with TaskRouter


Creating a Priority Queue for your Call Centre with TaskRouter

$
0
0

Queueing, lining up, waiting your turn. It’s part of life, especially for the British. Yes, we’re good at it. Yes, we even like it. Yes, that is why I wanted to write about it.

The new Twilio TaskRouter makes building and managing queues easy. In this post I’m going to show you how to build a call centre queueing system with TaskRouter in under 25 lines of Ruby.

But not all queues are equal, nor are all queuers. Sure, for the most part joining the back of a queue means you will need to wait for everyone in front of you to do their business before it’s your turn. Some people just want to join at the front of the queue though. In the real world this is just not cool. Unless you’re at an airport of course, in which the distance a person has recently flung themselves around the world with a particular airline feeds directly into how much of the queue they can skip. On the phone however, no-one knows if you’re queue jumping.

For many businesses this means they can offer different support tiers to their customers. Having a free support tier means all your customers can get in touch if they have difficulties with your product or service. Adding a premium tier to your support means you can deal with your high value customers or those requiring special attention much quicker by adding them to the front of the queue.

So, in this post we won’t just build a call centre queue, but we’re going to add priorities to the queue all within that 25 line limit. We’ll learn how to get started with TaskRouter, how it integrates with calls coming into Twilio and how to start interacting with it using the REST API.

We’ll start by building an application that places incoming calls into a single queue and then dishes them out to available agents. We’ll then augment that queue by giving priorities to certain calls so that they jump the queue and get the attention of the next available agent first. You can code the app up with me as we go or feel free to grab the taskrouter_priority repo from GitHub with the full example.

Getting started

If you want to follow along with this code, you will need a few things:

And that’s it! Jump into the terminal and kick up a new project:

$ mkdir taskrouter_priority
$ cd taskrouter_priority

We’ll start by creating a

Gemfile
for our dependencies,
app.rb
for our application code and
config.ru
to set application config and run our server.
$ touch Gemfile app.rb config.ru

Drop the following into your

Gemfile
:
# Gemfile
source "https://rubygems.org"

ruby "2.2.0"

gem "envyable"
gem "sinatra"
gem "twilio-ruby", "~> 3.15.0"

I’m including Sinatra so we can easily create a server and envyable to load our config into the environment. We’ll use a

config.ru
file to boot the application. This handles loading our dependencies, our config and the application file itself. Add this to your
config.ru
:
# config.ru
require "bundler"
Bundler.require

set :env, ENV["RACK_ENV"] || :development
disable :run

Envyable.load("./config/env.yml", settings.env)

require "./app.rb"
run Sinatra::Application

Now run

$ bundle install

Our application now needs some configuration. I already included the envyable gem, so we can create a config file and start filling in the credentials that we need.

$ mkdir config
$ touch config/env.yml

Then, in

config/env.yml
let’s add our Twilio credentials:
# config/env.yml
development:
  TWILIO_ACCOUNT_SID: YOUR_ACCOUNT_SID_HERE
  TWILIO_AUTH_TOKEN: YOUR_AUTH_TOKEN_HERE
  TWILIO_WORKSPACE_SID:
  TWILIO_WORKFLOW_SID:

Setting up the TaskRouter

You’ll notice in the configuration we created in the prior section we added a couple of variables that you might not recognise. These refer to elements of TaskRouter which we need to create within our account portal. The first thing we need is a Workspace which will act as a container for the TaskRouter elements we will use in this application. Let’s head to our account portal and create one right now. It needs a Friendly Name, let’s call it “Call Center Priority Queue”. Since we are creating a queue, you can pick the First In, First Out template.

Fill in the form with the friendly name as "Call Centre Priority Queue" and the template "First In, First Out"

Creating the Workspace using the template will set up a number of other elements in TaskRouter. As we picked the First In, First Out template we now have a system that will assign Tasks to Workers in the order that they are created.

Clicking on the Workflows tab you will see that we have a “Default Fifo Workflow” set up. Under Task Queues there is a “Sample Queue” ready for us to use. You won’t find anything in Workers or Tasks just yet, but the Activities tab has four states set up that we can use for our Workers once they have started dealing with Tasks. Note that only one of the Activities refers to the Worker being available.

The activities tab in the TaskRouter admin shows 4 activities, only Idle equates to Available though

By default, if we create a Task with this Workflow it will be placed on the Sample Queue. If we then create a Worker and set its Activity to “Idle” (i.e. Available) the Workflow will reserve the Task for that Worker and place the Worker into a “Reserved” state. Our application will then be responsible for placing the Worker into the “Busy” state, completing the Task and setting the Worker to “Idle” again. We’ll see how this all fits together as we build the application up.

We need to copy the Workspace SID and the Workflow SID into our config/env.yml file so we can use them later. You can grab them from their respective tabs in your account.

We just need one more thing from your account portal before we get back to building the application, the phone number that customers will call in on. You can access the numbers in your account by clicking on the dropdown menu in the header and selecting “Voice & Messaging”, or you can just click here to buy a number. Make sure you get a phone number that supports voice calls.

Configuring our Number

Once you have bought your number, click through to configure it. We need to make our server publicly available so that Twilio can send webhooks to it when the number receives calls. I recommend using ngrok for this, as described by my esteemed colleague Kevin in this post on testing webhooks locally. If you are using ngrok, then start it up to forward to port 9292, Rack’s default like so:

$ ngrok 9292

Edit the number you just bought, adding your ngrok URL with the path

/call
to the voice request URL. It should look a bit like this:

Enter your ngrok URL into the Voice request field.

Leave ngrok running in a terminal window for the rest of the post.

Building out the Queue

Let’s build the first webhook we need for this application. The first thing we want to do when someone calls our number is to send them into our new queue. Much like before TaskRouter came along, we are going to use the <Enqueue> TwiML verb for this. Instead of naming a queue we are going to pass our Workflow SID. This will automatically create a Task out of every incoming call and pass that into our Workflow. I added a welcome message to the call as well so the code looks like this:

# app.rb
post "/call" do
  content_type "text/xml"
  message = "Thanks for calling Phil's Company support line." \
            "One of our agents will speak with you soon."
  response = Twilio::TwiML::Response.new do |t|
    t.Say message, voice: "alice", language: "en-GB"
    t.Enqueue workflowSid: ENV["TWILIO_WORKFLOW_SID"]
  end
  response.to_xml
end

Let’s make sure this works. You can start your server with the command:

$ bundle exec rackup

Give your number a call, you will hear the message you set up followed by some hold music. Not so exciting so far but before you hang up take a look at the Tasks tab in the TaskRouter dashboard. You will find a Task sitting in the Sample Queue with an Assignment Status of “pending”. We’ve created our first Task! Sadly we have no way of dealing with it just yet so hang up your phone. Refresh the Tasks page and you’ll find the Task has been canceled.

When a Task is added to the TaskQueue the Workflow will check for available Workers to handle it. Once there is an available Worker TaskRouter notifies our app with a webhook, so we need to start ourselves a Worker and then build the endpoint in our application.

Creating a Worker

You can create a Worker in the account portal, but that’s no fun. Not now we have started writing code anyway. So let’s get back into the terminal and see what we can rustle up with the TaskRouter REST API. Firstly:

$ bundle console

This will load up an

irb
session with our
Gemfile
dependencies preloaded. We then need to instantiate ourselves a
Twilio::REST::TaskRouterClient
. This client is like the
Twilio::REST::Client
that you may be used to except it only concerns itself with TaskRouter objects. First we load our environment variables with envyable, then we initialize the
TaskRouterClient
with our account credentials and a Workspace SID. To show it’s working let’s list our current Workers.
> Envyable.load("./config/env.yml")
> task_router = Twilio::REST::TaskRouterClient.new ENV["TWILIO_ACCOUNT_SID"], ENV["TWILIO_AUTH_TOKEN"], ENV["TWILIO_WORKSPACE_SID"]
> task_router.workers.list
=> []

That’s right, we have no workers! Let’s change that. When we create a worker we need to give it a Friendly Name and we can give it any attributes we want. Attributes are intended to allow you to describe the skills and capabilities of a worker so that you can manage what tasks they are assigned. To do this, we pass in a JSON object of attributes. When TaskRouter assigns this Worker a Task we will receive this attributes object as part of the webhook. For now, let’s add a Worker called “Me”, give it the attribute “contact_uri” and set it to your own phone number (your actual phone, not a Twilio number). Make sure to include the country code for the number too.

> worker = task_router.workers.create(
*   friendly_name: "Me",
*   attributes: { contact_uri: "+447XXXXXXXXX" }.to_json
> )
=>

You can go to the account portal and check you can see the Worker there too. You’ll see that our Worker is currently Offline and therefore not available. You could update that in the account portal again, but let’s stick with the console for now.

To update our Worker’s activity, we need to find out the activity SID for the Idle activity and update our Worker’s activity SID to match that.

> idle_activity = task_router.activities.list(friendly_name: "Idle").first
> worker.update activity_sid: idle_activity.sid
> worker.available
=> true

We have a live Worker! Let’s make sure this is working as we expect. Call your Twilio number up again, you’ll hear the message then the hold music. If you look at the Tasks dashboard you will find you have a Task that has the Assignment Status “reserved”, look at the Workers tab and you will see your Worker with the “Reserved” Activity. Hangup and the Task will transfer to “canceled” and your Worker will return to “Idle”.

A task has been reserved

A worker has also been reserved

Next we need to set up our application to receive the webhook when a Task is being assigned our Worker.

Receiving instructions

So far, we have an endpoint that intercepts calls and creates Tasks on our Queue. We have created a Worker and it is ready to receive Tasks. With both these items in place we look to the assignment callback.

When the TaskRouter wants to assign a Task to a Worker it sends a webhook to our defined endpoint with the details of the Task and the Worker. Our application needs to respond and say what the Worker is going to do. There are few possible responses and there are more details on those in the documentation, but here’s a quick rundown:

accept: the most basic response, this tells TaskRouter that your Worker will do the job, but how the Task is completed is now up to your application
reject: also fairly basic, this returns the Task to the queue to be assigned again
call: this will make a call to a Worker with a TwiML URL provided, allowing your application to handle the call the way it wants to
redirect: accepts the Task and redirects the Task’s call to a TwiML URL you provide
dequeue: this response does a lot, it handles all the cases for simply transferring a call to an agent, we’re going to use it now

So we want to respond to our assignment callback with a dequeue instruction which tells TaskRouter to connect the incoming call with our Worker’s contact_uri attribute. We respond to the TaskRouter with JSON, so let’s build up that response now.

Firstly we need to require the json module from the standard library:

# app.rb
require "json"

Then we build our endpoint:

# app.rb
post "/assignment" do
  content_type "application/json"
  { instruction: "dequeue" }.to_json
end

Pretty simple, right? This isn’t handling our priorities just yet, but we’re about to connect our first call through our TaskRouter queue. We need to restart our server:

$ bundle exec rackup

Our ngrok server should still be running, grab the URL again. Open up the Workflow admin, edit your Workflow and add your ngrok URL with the path

/assignment
to the Assignment Callback URL field. It should look a bit like this:

Enter your publicly available assignment URL into the Assignment Callback URL field.

Now we are ready to connect a call! We’re going to be calling our Twilio number which will place the call into our Workflow’s Task Queue. Our Worker is already live and waiting for calls so the TaskRouter will assign the call which will connect our inbound call to our Worker’s contact_uri and the call will be connected. As you already know, we set our Worker’s contact_uri to our own phone number so we can’t make the call from that phone. If you have a spare phone lying around grab that. If you don’t have that luxury hit the Heroku Deploy button on this Twilio Client GitHub project and you’ll have your own browser phone set up in no time.

Testing time

Punch in the number you bought at the start of this post, you will hear the message you set up followed by the Twilio default hold music. During this time a Task is created and sent through the Workflow you supplied. TaskRouter will notice your Idle Worker and reserve the Task for it. It makes a POST request to your

/assignment
endpoint which responds with the dequeue instruction and the call is connected to your worker. And your phone rings!

There was a little bit of magic here, the default instruction takes the contact_uri attribute that we set on the Worker and forwards the call to it. Notice that the call came from your original Twilio number. That is because the dequeue instruction takes that from the incoming call’s target number. You can set the to and from numbers within the JSON instruction if you want to, but this way is easier all round.

Adding priorities

I know what you’re thinking, “This has been a very long winded way of doing call forwarding so far. Where’s the priority queue?”

Let’s get to that now.

If you made the test call just now and you have hung up, then you will see in the account portal that your Worker is still set to “Busy”. In order to deal with a queue we are going to have to reset the Worker to “Idle” after each call. Open the Activities tab, grab the SID for the Idle Activity and add that to your

config/env.yml
file like so:
# config/env.yml
development:
  TWILIO_IDLE_SID: "YOUR_IDLE_ACTIVITY_SID"

In your assignment callback add one extra key to the JSON object:

post "/assignment" do
  content_type "application/json"
  {
    instruction: "dequeue",
    post_work_activity_sid: ENV["TWILIO_IDLE_SID"]
  }.to_json
end

This will set your Worker back to Idle once a call is complete. Set your Worker to “Idle” via the form in the admin for now. Go ahead and make a couple of calls to your Twilio number. You should see two Tasks appear in the admin and you can then answer them one by one as they get forwarded to your phone. At the end, your Worker will be Idle again.

Priorities

We need a way to figure out which of our incoming calls are priority calls or otherwise. For the purposes of this demo, I’m going to set up a second number that dials into the same TwiML and will be my priority line. You could do the same within your application or you could look up customers by the number they dial from and set their priority that way.

Buy yourself another number in your Twilio account. Set the voice request URL to the same URL as your original number. Now add the new number to your

config/env.yml
file like so:
# config/env.yml
development:
  PRIORITY_NUMBER: YOUR_PRIORITY_NUMBER

Back in the application we need to check whether our customer has called in on our priority number or not. If they have we can set a status on the task that our Workflow can check for and prioritise the Task.

Change the

/call
endpoint to do this check and set some TaskAttributes within the
 verb.
post "/call" do
  content_type "text/xml"
  task_attributes = {}
  task_attributes[:status] = "Gold" if params["To"] == ENV["PRIORITY_NUMBER"]
  message = "Thanks for calling Phil's Company support line." \
            "One of our agents will speak with you soon."
  response = Twilio::TwiML::Response.new do |t|
    t.Say message, voice: "alice", language: "en-GB"
    t.Enqueue workflowSid: ENV["TWILIO_WORKFLOW_SID"] do |e|
       e.TaskAttributes task_attributes.to_json
    end
  end
  response.to_xml
end

After we reload our server we just need to adjust our Workflow to prioritise these calls. In the account portal open the Workflow for editing. At the bottom of the form is a section for “Routing Configuration”. Currently just the default queue is in there. Every call that comes into this queue is placed at the end of the Sample Queue and answered in turn.

Click “Add another filter” and start to fill in the form that appears. The filter name is just a description for us, let’s call it “Priority Status”. The expression is a SQL-like statement that can be used to match attributes on the Task. As we just added a “Gold” status to calls into our priority number let’s use the expression

status == "Gold"
. You can read more about expressions in the documentation. Finally, since we want these calls to be a higher priority, let’s set the priority of Tasks that match our expression to 2 (Tasks are priority 1 by default). Save the Workflow and let’s test our Priority system.

Fill in the Filter name and the expression as described.

Final Testing

For this you need two spare phones or two Twilio Client pages set up. From one call your original number and from the other call your new priority number. Your phone will start to ring and if you answer it and open up the Tasks page you will see two Tasks, one with priority 2 which has been assigned and the other with priority 0 that is pending. Once you answer and hang up on the first call, the second one will dial through to your phone. Your priority system is up and running!

TaskRouter and away!

Hopefully with this example, you can see the power of TaskRouter. With two simple endpoints and a little configuration we have the basis of a call centre that can prioritise incoming calls and distribute them amongst one or more agents. Check out the final code on GitHub.

This is just the start of what you can do with TaskRouter. From here we could add more incoming numbers that could direct to different queues depending on whether it was a support call or a sales call. We can also start setting timeouts on queues such that if a call isn’t dealt with within a certain time it can be moved to a queue where it will get answered quicker. We could also create our call centre within the browser using Twilio Client and the TaskRouter Worker.js libraries to create a UI for our agents.

This is just scratching the surface of what can be achieved with TaskRouter and a few lines of code. If you’ve got ideas about how to extend this app, entirely new uses of TaskRouter or if you’re British and disappointed in me for encouraging queue jumping just grab me on Twitter at @philnash or drop me an email at philnash@twilio.com.

Happy task routing!

Creating a Priority Queue for your Call Centre with TaskRouter

TaskRouter and the Internet of Things

$
0
0

There are millions of devices hooked up to the Internet and generating data, from refrigerators monitoring their contents to webcams tracking intruders. These connected devices, collectively referred to as the “Internet of Things” often create work that needs to be done by humans. How do we keep track of all that work? How do we assign that work to an appropriately skilled and available worker? How do we know when it’s done?

To solve problems like these Twilio just launched TaskRouter, a service to distribute work that needs to be done to workers who can do it.

In a recent post, Greg Baugues showed how to build an Arduino Yún powered photobooth. In this post we’re going to take the images generated from the photobooth and create a task that only humans can do — coming up with funny captions.

How Does It Work?

The photobooth tutorial culminated in uploading photos to Dropbox. This tutorial picks up where it left off.

  • When a new file is uploaded to Dropbox a task gets created
  • Volunteers text into the system and are added as a worker
  • Workers are set to “Idle,” indicating that they are available to do work
  • TaskRouter matches a picture that needs captioning with an idle worker. Our app sends them a photo via MMS
  • The worker is marked as “Busy” until they reply with a caption
  • Once a caption is received, worker is changed back to “Idle” and waits for their next assignment

Getting Started

We’re going to build our distributed photo captioning app using Ruby and Sinatra.

You don’t need a fully functional Arduino powered photobooth to follow along with this post. You do, however, need to set up a Dropbox app. You can find those instructions in the “Arduinos and Dropbox” section in the photobooth tutorial. Once you have your Dropbox app setup you can mimic the photobooth by manually uploading files to Dropbox.

In addition to a Dropbox app, you’ll need:

  • a free Twilio account
  • an MMS-enabled Twilio number (only available on US and Canadian numbers)
  • ngrok, free IP tunneling software

A Note on Ngrok

Your development machine is most likely hiding behind a router and lacks a publicly accessible IP address. However, both Dropbox and Twilio need to make HTTP requests to this app, so you’ll need to create a tunnel from the public internet to your local server.

Our favorite way to do this is ngrok. If you haven’t already, download ngrok and move it to your home directory. Also sign up for a free ngrok account and follow the instructions on how to set up custom domains. This way you won’t have to change your webhook urls on the Twilio and Dropbox dashboards everytime you restart ngrok. If you’d like to learn more about ngrok, check out Kevin Whinnery’s great tutorial on ngrok.

Once you’ve got ngrok installed, start it up with a custom subdomain (your name perhaps) and point it at port 9292:

./ngrok -subdomain=example 9292

Leave ngrok open in a terminal window for the rest of this tutorial.

Setting Up TaskRouter

The best place to start building a TaskRouter application is the TaskRouter dashboard. TaskRouter applications are scoped to a Workspace. Let’s make one:

  • Click Create Workspace
  • Give your workspace a friendly name of “Photobooth Captions”
  • Leave Template set to None
  • Click Save

Once your workspace is created, change the Default Activity from “Offline” to “Idle.” We’ll discuss why in a few minutes but the short answer is that we want our workers ready to receive work as soon as they enter the system.

create_workspace.png

Next we need to create a Task Queue. Click Task Queues at the top of the dashboard, then click Create Task Queue and configure it with the following properties:

create_caption_queue.png

The key property here is Target Workers which states that workers eligible to complete Tasks in this Task Queue must have a skill of “caption”. For the purposes of this tutorial we’ll only have one kind of worker but Task Queue really starts to shine when you have a multitude of task types requiring a multitude of skillsets. Once you’ve completed this tutorial you’ll be in a great position to create something more complex.

Once you’ve configured your Task Queue, click Save.

Next we need to create a Workflow which will route Tasks into our Task Queue. Click Workflows at the top of the dashboard, then click Create Workflow. Configure it with these properties:

  • Friendly Name: Photobooth Workflow
  • Assignment Callback: http://example.ngrok.com/assignment (replace example with your ngrok subdomain)
  • Leave Fallback Assignment Callback URL and Task Reservation Timeout blank
  • Leave “Caption Queue” as the default task queue
  • Click Save

Twilio_User_-_Account_Taskrouter_Workspaces_Workflows_Create.png

By default, the Workflow will place Tasks into the Caption Queue because of the Default Task Queue setting. If we wanted to be more explicit about this to prepare for a more robust system, we could create a Filter in the Routing Configuration section. Let’s configure a filter for our captioning tasks. Click the Add Filter button and set the following properties:

  • Filter Label: Caption Filter
  • Expression: required_skill = "caption"
  • Target Task Queue: Caption Queue
  • Priority: 1

With this filter in place, a Task with required_skill set to “caption” in its attributes will be routed to the Caption Queue. Your Routing Configuration should look like this:

create_workflow.png

Click Save to complete the Workflow creation. This is all the setup we need to do on our dashboard. Let’s get into the code.

Creating the Sinatra App

Our application will be built in Ruby using Sinatra. Let’s create a directory for our app and a few of the files we’ll need to get started:

mkdir photobooth-taskrouter
cd photobooth-taskrouter
touch app.rb Gemfile config.ru

Then edit the Gemfile:

source "https://rubygems.org"

ruby '2.2.0'

gem 'sinatra'
gem 'thin'
gem 'twilio-ruby', '~> 3.15.1'
gem 'dropbox-sdk'
gem 'envyable'

Install bundler if you haven’t already:

gem install bundler

Then install your gems:

bundle install

Along with the gems for the Dropbox and Twilio, we’ve included Envyable, a gem to manage environment variables. (For more on this, read Phil Nash’s excellent post on managing environment variables in Ruby).

To use envyable we need to create a config directory and a env.yml file:

mkdir config
touch config/env.yml

Open env.yml and add the following YAML:

development: 
  TWILIO_ACCOUNT_SID: 
  TWILIO_AUTH_TOKEN: 
  TWILIO_WORKSPACE_SID: 
  TWILIO_WORKFLOW_SID:
  TWILIO_PHONE_NUMBER:
  DROPBOX_ACCESS_TOKEN:

Copy in the values for your Twilio Account SID, Twilio Auth token — you can find these by clicking “Show credentials” in the top right of the Workspace dashboard. Then copy in the Workspace SID and Worklow SID — you can find these on their respective pages. Then paste in the phone number of one of your MMS enabled Twilio phone numbers.

For the Dropbox token, visit the Dropbox App Console and click into the app you created earlier. In the OAuth 2 section, click Generate under “Generated access token” and copy the resulting token into the YAML.

With our env.yml in place, our environment variables will now be accessible via ENV['NAME_OF_VARIABLE'].

Now let’s start on our Sinatra app. Open ‘app.rb’, paste these lines, and save the file.

require 'dropbox_sdk'
require 'json'

Envyable.load('./config/env.yml', 'development')

Finally, edit the config.ru which tells our server what to do when we run rackup.

require 'bundler'
Bundler.require

require './app.rb'
run Sinatra::Application

If you want to test that this works so far, see if you can start your server without getting any errors:

bundle exec rackup

Configuring the Dropbox Webhook

Our application will utilize Dropbox’s webhook to receive notifications when files are uploaded. This allows us to create Tasks for our app as the photos come in. Before we use the webhook though, we have to verify our app with Dropbox.

For the verification process, Dropbox will make a GET request to our webhook with a challenge parameter. Our HTTP response must simply include the text of that challenge.

Create a new route in app.rb to handle this request:

get '/dropbox' do
  params[:challenge]
end

Restart the app.  Then visit the Dropbox App Console and add http://<your_ngrok_subdomain>.ngrok.com/dropbox to the Webhook URIs field.

dropbox-webhook.png

Once you click Add, Dropbox will verify our domain. We could delete the GET /dropbox route after that, but if we ever change domains (e.g., deploy to production) then we’re going to need to reauthorize again. Might as well leave it there.

If you’d like to learn more about this authorization process or about interacting with the Dropbox API in general, check out their well-written API docs.

Using the Dropbox API’s /delta Endpoint

When a photo is uploaded, Dropbox will make a POST request to our  /dropbox webhook (this is in addition to the GET /dropbox we used to verify our app). The information provided in the POST request is pretty limited. It only contains an array of User IDs that have new file changes in the Dropbox app we configured but it doesn’t contain any additional information about the actual file upload itself.

Since we the webhook request doesn’t tell us which files were added, we need to  request a list of recent Dropbox changes via their delta method. In order to make sure we’re not getting duplicate changes, we need to save a “cursor” returned to us by Dropbox and pass it back in on subsequent delta calls. For the sake of moving fast in this tutorial, we’re going to do this the wrong way and store the cursor in a global variable. Please use a proper datastore in a real app.

Below Envyable.load('./config/env.yml', 'development') in app.rb, add this:

$cursor = nil

Now we’re going to create a post /dropbox route which will:

  • create a REST client using our Dropbox access token
  • retrieve a list of changes to our Dropbox folder since our last cursor
  • save the new cursor

Then it will iterate through each file in the list of changes and:

  • grab its filename
  • request a publicly accessible url from dropbox using our REST client
  • create a new task in TaskRouter (we’ll leave a placeholder for this for the moment)

And finally, it will return a 200 — otherwise Dropbox will keep trying the request over and over and over again.

Here’s the code:

post '/dropbox' do
  dropbox_client = DropboxClient.new(ENV['DROPBOX_ACCESS_TOKEN'])
  changes = dropbox_client.delta($cursor)
  $cursor = changes['cursor']

  changes['entries'].each do |entry|
    file_name = entry[0]
    media_hash = dropbox_client.media(file_name)
    image_url = media_hash['url']
    # create task 
  end
  200
end

If you’d like to learn more about what we’ve done here, check out Dropbox’s core API docs.

Create a Task with TaskRouter

We’re going to be doing a lot of work with Twilio, so let’s create a twilio_helpers.rb file to keep our code clean:

touch twilio_helpers.rb

Now let’s create a helper method in twilio_helpers.rb to instantiate a TaskRouter REST API client:

def task_router_client
  Twilio::REST::TaskRouterClient.new ENV['TWILIO_ACCOUNT_SID'], ENV['TWILIO_AUTH_TOKEN'], ENV['TWILIO_WORKSPACE_SID']
end

Then let’s require the twilio helpers in our app.rb:

require './twilio_helpers.rb'

We’ll use our client helper to create a new task with the image_url as an attribute. Replace the # create task comment with:

attributes = { image_url: image_url, required_skill: 'caption' }.to_json
task_router_client.tasks.create(
  attributes: attributes,
  workflow_sid: ENV['TWILIO_WORKFLOW_SID']
)

Let’s test what we’ve build so far. Restart your Sinatra server and upload a file to Dropbox — either via your Photobooth or by simply dragging an image into the folder of the your Dropbox app.

Once the file uploads, the webhook will fire and hit the /dropbox route, which will then create a task in TaskRouter. Open the TaskRouter dashboard and go to the Tasks page. You should see a new Task. If you click on the Task, you’ll see the image_url.

Create a Worker in TaskRouter

Now that we can create tasks, we need workers who can complete those tasks.

Workers will join the system by texting our Twilio number. We need to configure the webhook that Twilio will use when it receives a new text. Open the numbers list on your Twilio dashboard, click on the phone number you entered earlier into the env.yml, and configure the number by setting the Messaging Request URL to http://<your_ngrok_subdomain>.ngrok.com/message.

configure_number.png

For the sake of this post, we’re going to concern ourselves with two scenarios when someone texts in:

  1. They’re texting in for the first time. We’ll create a worker using their phone number as a friendly name.
  2. They’re providing a caption. We’ll save it, then set the worker as ready to receive more tasks.

Before we create the route to handle the webhook, let’s create two more helper methods in twilio_helpers.rb.

First, a method to check if a worker exists for a given phone number:

def worker_exists?(phone_number)
  task_router_client.workers.list(friendly_name: phone_number).size > 0
end

Second, a method to simplify the generation of TwiML responses which we’ll use to reply to people when they text into the system:

def twiml_response(body)
  content_type 'text/xml'
  Twilio::TwiML::Response.new do |r|
      r.Message body
    end.to_xml
end

Now let’s head back to app.rb and create a  /message endpoint.

For now we’ll focus on the first use case: someone texts in and a worker with that number does yet not exist:

In that case we will create a new worker with:

  • an attribute defining their phone number
  • the friendly name set to their phone number to make them easier to identify

We’ll also reply with a text message telling them to hold tight and wait for their photo.

post '/message' do
  phone_number = params['From']

 if worker_exists?(phone_number)
    # we’ll come back to this soon
  else
    attributes = {phone_number: phone_number, skill: 'caption'}.to_json
    task_router_client.workers.create(
      attributes: attributes,
      friendly_name: phone_number,
    )

    twiml_response("Hold tight! We'll be sending you photos to caption as soon as they become available.")
  end

end

Let’s test this out. Restart your server, then send a text message to your Twilio number. Once you get a reply, check the workers tab on the TaskRouter dashboard. You should see a new worker that has your phone number as a friendly name.

Something else is afoot though. If you look at your server, you’ll see that TaskRouter tried to make an HTTP request at /assignment, but we haven’t defined that route yet. Let’s do that now.

Assign Work

When we have a task in the system and an idle worker who’s qualified to do the work, TaskRouter starts to perform its magic. When TaskRouter sees a potential match, it makes an HTTP request to the assignment webhook defined on our Workflow dashboard. This HTTP request sends information about the task and asks if you’d like the worker to accept it.

In that request, we have everything we need to send a worker their task: the image_url and worker’s phone number.

Let’s create a route that will:

  • respond to a POST request at /assignment
  • extract the phone_number from worker_attributes
  • extract the image_url from task_attributes
  • store the image_url for later
  • call a twilio_helper named send_photo which we will define in just a second
  • return JSON instructions to TaskRouter to tell it that the worker accepts the task

We also need to store data about our image urls and captions. We’re not going to tell you how to do that in this post. Feel free to use MySQL, DynamoDB or the storage engine of your choice. For the purposes of this post, we’ll just leave a comment where you would save the pieces of data you want to persist.

Create your route to handle assignment:

post '/assignment' do
  worker_attributes = JSON.parse(params['WorkerAttributes'])
  phone_number = worker_attributes['phone_number']

  task_attributes = JSON.parse(params['TaskAttributes'])
  image_url = task_attributes['image_url']

  # save then image_url and phone_number pair

  send_photo(phone_number, image_url)

  content_type :json
  {instruction: 'accept'}.to_json
end

The first four lines extract the image_url and phone_number from the parameters sent to us by TaskRouter. Then we send a photo using a Twilio helper we’ll define in a second. The last two lines return JSON telling TaskRouter that our worker accepts the task.

Now let’s create our send_photo method in twilio_helper.rb:

def send_photo(phone_number, image_url)
  twilio_client = Twilio::REST::Client.new ENV['TWILIO_ACCOUNT_SID'], ENV['TWILIO_AUTH_TOKEN']
  twilio_client.messages.create(
    from: ENV['TWILIO_PHONE_NUMBER'],
    to: phone_number,
    body: "What's the funniest caption you can come up with?",
    media_url: image_url
  )
end

We’ve got everything in place to assign a task to a worker and to send them an image to caption. Let’s try it out.

We need your phone number to be a “new” worker for this to work, so go back into your dashboard, click on the worker you created previously, toggle their Activity to “Offline” and then delete it.

Then restart your server to load the changes we just made. After that, send a text to your Twilio number again, and our app will respond with the introductory text like last time.

Now TaskRouter makes a POST request to your newly created /assignment route. You can watch this happen by visiting localhost:4040 in a browser. That route will fire off the MMS with the Dropbox picture to your phone.

Responding to the Worker’s Message

We’ve created a worker in the ‘Idle’ state and they’ve just received their first captioning task. What happens when they text back? After we’ve saved the worker’s caption, we’ll transition them back to the ‘Idle’ Activity so that they will receive more photos to caption.

Let’s create a Twilio helper to retrieve a worker based on their phone number. In twilio_helper.rb:

def get_worker(phone_number)
  task_router_client.workers.list(friendly_name: phone_number).first
end

Let’s create another helper to retrieve the SID for the ‘Idle’ activity:

def get_activity_sid(friendly_name)
  task_router_client.activities.list(friendly_name: friendly_name).first.sid
end

And then we’ll use those two methods to change the worker’s activity back to “Idle”:

def update_worker_activity(phone_number, activity_friendly_name)
  worker = get_worker(phone_number)
  activity_sid = get_activity_sid('Idle')
  worker.update(activity: activity_sid)
end

With these helpers in place we can respond to the existing worker’s incoming message. In the /message endpoint of app.rb let’s add the following code to the if worker_exists? block that we said we’d come back to:

if worker_exists?(phone_number)
    caption = params['Body']
    # save the caption in the same place you stored the image_url and phone_number pair
    update_worker_activity(phone_number, 'Idle')
    twiml_response(“Thanks for the caption! We’ll send you more photos as they come available.”)
else
  # ...

That’s all the code for this app. Restart your server to reload the changes. Then send a hilarious text to your Twilio number. You’ll get a thank you back and your activity in TaskRouter will be switched back to Idle. If there are more tasks waiting in the taskqueue, TaskRouter will make another POST request to the /activity route and your phone will light up with another picture. You’ll respond with a funny caption, and so it goes.

Next Steps

Let’s recap. In this post we:

  • Created a new workspace, workflow and task queue in TaskRouter
  • Created tasks in response to a Dropbox upload
  • Allowed volunteers to sign up as workers via text message
  • Assigned photos to be captioned by workers
  • Updated a worker’s status once the task was completed

TaskRouter has given us a solid foundation for our application that is easily extendable to an even more diverse set diverse set of tasks across workers with varying skills. Consider extending what we built in this post with the following suggestions:

  • Create specialized captioners (for instance, some people might be better at captioning wedding photobooth pictures while others are better at office party photos).
  • Create a second Task Queue for people who can rate captions (the Internet is great at quantity but we might want some quality control).
  • Build a website to show off these hilarious captions.

I’m really excited to see what you build with TaskRouter. If you have any questions while you’re building your application, please reach out to me via email at brent@twilio.com or hit me up on Twitter @brentschooley.

TaskRouter and the Internet of Things

Building A Salesforce Powered Call Center with Twilio TaskRouter

$
0
0

ThinkVoice gives businesses the communications tools they need to create exceptional customer experiences. ThinkVoice CEO Brian Coyle knows that something as simple and powerful as making a phone ring can be difficult to do at a large scale. That’s where ThinkVoice comes in. To ensure they’re giving their customers reliable and scalable communication solutions, ThinkVoice uses Twilio.

After the launch of Twilio’s TaskRouter, ThinkVoice added a new tool to their tool belt that enables them to manage traditionally difficult aspects of call center data like agent state, queue information, and more.

In the following post, Bryan Coyle shows how to build a Salesforce powered call center with Twilio’s TaskRouter. Read the original blog post here.

Building A Salesforce Powered Call Center

This is a beginner’s guide to implementing an omnichannel call center directly into your Salesforce CRM using Salesforce Open CTI, Twilio TaskRouter and Twilio client.  The source code for the solution is available here. The tutorial is aimed at developers looking to build a call center within Salesforce or just looking to learn more about TaskRouter.  If you just want to check out the end product you can deploy it to Heroku straight away.  If you aren’t a developer but want to learn more give us a shout and we can give you a demo.

If you want to bring phone calls into your Salesforce CRM you are, in the best case scenario, integrating a stand alone cloud based call center product with prebuilt connectors, or at worst integrating an on premise legacy PBX through multiple layers of integration.  In either case you are managing your call center across multiple systems leaving you with a management headache that is extremely costly and error prone.  The following tutorial aims to solve this headache by reducing dependence on third party solutions and leaving as much configuration in Salesforce as possible.

Omnichannel

The demo demonstrates the ability to handle multiple channels of communication using Twilio TaskRouter to manage a single queue of communications coming from different channels.  This has been a real struggle as point solutions are only able to handle one or two communication channels and few support SMS as a channel.

Brief Overview the Technologies Used

The tutorial is built on the fantastic demo of a Salesforce embeddable ACD using Twilio Client by Charles Oppenheimer of Twilio.  Many thanks to Charles for sharing that demo.  We have simply taken that demo and inserted TaskRouter to handle the distribution of calls and addition of text messages.

  • Salesforce Open CTI –Salesforce Open CTI is an open API to allow third party CTI vendors to connect telephony channels into the Salesforce CRM interface.  In our demo we use Open CTI to house our soft phone and drive the click to dial/text functionality.  The demo requires no plugins or installed software thanks to the design of Open CTI. For more info see the developer guide.
  • Twilio ClientTwilio Client is a WebRTC interface to Twilio.  In our demo we are using the javascript library which gives us an API and connection to Twilio to receive the call within our Salesforce browser delivering the call via WebRTC.  Twilio client also gives us the ability to control the call via our soft phone.
  • Twilio TaskRouter TaskRouter is the queue and state machine that we have our Salesforce users connect to through the Open CTI soft phone.  We route all of our calls and texts through TaskRouter which manages the queueing of those  communications.  TaskRouter also monitors the state of our Salesforce users sending them the calls and texts as they become available.  What differentiates TaskRouter from traditional cloud or on premise phone systems is it’s completely API driven so we can place all administrative functions within Salesforce.

Getting Started – Part 1 – Phone Calls

First I highly recommend going through the original client-acd project from Charles as he covers all the basic setup including Twilio setup.  Our README covers the additional setup steps of configuring the necessary TaskRouter components.  At a high level we have replaced any code that was managing agent state or call queueing with TaskRouter code including removing all the Mongo DB code.  Mind the twilio-gem version.  The TaskRouter stuff is in after 3.15.  The rest of the post is going to cover the implementation of TaskRouter.

 Call Routing With TaskRouter

Lets start with routing incoming calls to TaskRouter.  In our Sinatra app we are going to change the /voice action to send the call into our workflow via Twiml.  This will immediately route our incoming call into the queue that is now managed by TaskRouter and the workflow we defined.  With that we now have a call in queue waiting for agent.  Very simple!

post '/voice' do
  response = Twilio::TwiML::Response.new do |r|  
    r.Say("Please wait for the next availible agent ")
    r.Enqueue workflowSid: workflow_id
  end
  response.text
end

Lets now hook up the agent state.

Salesforce Agent State Handling

Thanks to the work done in the original project it was really easy to plug the agent into TaskRouter.  As the softphone loads up within the Salesforce browser the softphone.js code was already pulling the agent id from the Salesforce API and registering as a Twilio Client.  Once we have a Twilio Client established we then go to register the agent with TasksRouter.  Much like registering a Twilio Client we need to get a token from the server with the proper permissions. In our code we pass the Salesforce user id in an ajax call so we can use that to match to the correct worker defined with TaskRouter.

$.get("/workertoken", {"client":SP.username}, function (workerToken) {
    SP.worker = new Twilio.TaskRouter.Worker(workerToken);
    SP.functions.registerTaskRouterCallbacks();
    var activitySids = {};
 
    // For this demo we assume basic states to map to the existing Ready/Not Ready so we will
    // take 1 ready and 1 not ready event
    // In real app we would make an interface with dynamic state drop down and map them here
    SP.worker.fetchActivityList(function(error, activityList) {
      var activities = activityList.activities;
      var i = activities.length;
      while (i--) {
        if (activities[i].available){
          SP.actvities.ready = activities[i].sid
        } else {
          SP.actvities.notReady = activities[i].sid
        }      
      }
    });
});

On the server we use the Twilio REST API to create a client to TaskRouter. With the REST API we can loop through all the workers that are defined for our Workspace, find the worker that corresponds to our salesforce agent and generate a token for that worker. We return that token back to the client side where our javascript function instantiates a worker via the worker.js library.

## If a workers is defined with the client name it returns a token for the TaskRouter worker
get '/workertoken' do
  client_name = params[:client]
  if client_name
    @trclient = Twilio::REST::TaskRouterClient.new(account_sid, auth_token, workspace_id)
    workertoken = nil
    @trclient.workers.list.each do |worker|
      logger.info worker.friendly_name
      if worker.friendly_name == client_name
        worker_capability = Twilio::TaskRouter::Capability.new account_sid, auth_token, workspace_id, worker.sid
        worker_capability.allow_worker_fetch_attributes
        worker_capability.allow_worker_activity_updates
        workertoken = worker_capability.generate_token
      end
    end
  end
  return workertoken || ""
end

Worker.js is the javascript SDK that gives us the ability to receive work from the queue and gives us the ability to manage agent state. In this example we register for the activity.update callback which will let our client know anytime this agent changes state and when it does we update the UI. Worker.js also allows us to retrieve a list of activities or states that an agent can be set to. Each activity (or state) is either Available or Unavailable meaning they can take work or not. In this demo we assume one activity is available and will store the sid of one Available activity and one Unavailable activity. We use these sids to set the agent state later.

// callback for TaskRouter to tell use when agent state has changed
SP.functions.registerTaskRouterCallbacks = function(){
  console.dir("Register callbacks");
  SP.worker.on('activity.update', function(worker) {
    SP.functions.updateStatus("", worker);
    console.log("Worker activity changed to: " + worker.activity_name);
  });
}

So we now have a call in queue, and a salesforce agent able to register to the queue and manage their state. Lets see how work gets distributed to our agent.

Routing Calls to the Salesforce Agent

Back when we setup our inbound call handling in client-acd.rb /voice we simply redirected the call to the TaskRouter Workflow with Twiml. Because we did this there is a little magic baked into TaskRouter we can take advantage of. First lets understand how TaskRouter routes work. The call came into Twilio and was directed to a workflow. The workflow is aware of workers (agents) who have attributes that the workflow can use to determine who should take that work. In this demo the workflow is acting as a simple queue knowing who has been idle for the longest. When we log into salesforce and click the Ready button Worker.js tells TaskRouter that our worker/agent is available. TaskRouter assigns the activity (the call in this case) to the agent. The workflow is configured to POST that assignment to our Sinatra app at /assignment. When the app receives that POST we simply tell TaskRouter to dequeue the call to the agent’s Twilio Client ID which is configured on the worker’s attribute

{“contact_uri”: “client:salesforce_login_id”}
…magic!
#######  This is called when agents is selected by TaskRouter to send the task ###############
## We will use the dequeue method of handling the assignment
### https://www.twilio.com/docs/taskrouter/handling-assignment-callbacks#dequeue-call
post '/assignment' do
  raw_attributes = params[:TaskAttributes]
  attributes = JSON.parse raw_attributes
  logger.info attributes
  from = attributes["from"]
  logger.info from
  assignment_instruction = {
    instruction: 'dequeue',
    from: from
  }
  content_type :json
  assignment_instruction.to_json
 
end

Wrapping Up

TaskRouter has really simplified our code as we don’t need to manage agent state. We still keep a websocket connection and polling to push real time stats up to our soft phone giving our agent the number of logged in agents and number of items in the queue. We use the TaskRouter REST API to get that info.

## Thread that polls to get current queue size, and updates websocket clients with new info
## We now use the TaskRouter rest client to query workers and agents
Thread.new do
   while true do
     sleep(1)
     stats = @trclient.task_queue_statistics(task_queue_id).realtime
     qsize = stats["tasks_by_status"]["pending"]
     readycount = stats["total_available_workers"]
 
      settings.sockets.each{|s|
        msg =  { :queuesize => qsize, :readyagents => readycount}.to_json
        logger.debug("Sending webocket #{msg}");
        s.send(msg)
      }
     logger.debug("run = #{$sum} #{Time.now} qsize = #{qsize} readyagents = #{readycount}")
  end
end

In the next part of this demo we will add text message routing to our Salesforce Call Center. Stay tuned.

Learn more about ThinkVoice here

Building A Salesforce Powered Call Center with Twilio TaskRouter

LendUp Helps Customers Personally, Runs Their Call Center Programmatically With TaskRouter

$
0
0

When you’re trapped in a cycle of debt and it’s hard to figure out how to get out, and who to turn to. LendUp works with people who have less than stellar credit to not only offer them loans, but offer them a path back to financial health, a process they call the LendUp ladder.

Short term lenders often build their business models on opaque terms and hidden fees. They lure prospective customers with the promise of quick cash, burying the costs and interest rate in the fine print. Unsuspecting customers are eager to apply, only to realize the costs when it’s too late.

LendUp, a tech startup whose first product is an alternative to payday loans, is looking to disrupt the traditional payday loan industry by fixing what’s wrong: presenting clear terms, conditions, and pricing; eliminating ‘hidden’ fees; and getting rid of ‘rollovers’ that can balloon into a debt trap for unsuspecting customers.

Meeting Urgent Needs By Using The Right Tools

lendupfeature

When LendUp’s customers contact them, it’s typically urgent. Money matters rarely come without a hard deadline.

LendUp wants to deliver a type of customer experience that might be unfamiliar — a timely and personal one. If their customers called a short term lender’s customer support center, odds are they weren’t taken care of in a timely manner.

LendUp makes personal phone support a priority. This is no small feat considering they made 55,000 calls to customers and received 81,000 calls from customers in June alone.

Quality phone support dramatically expedites customers’ application process and gets their customers on the path to better credit. The (fortunate) problem is that a ton of people want better credit. So, the phones are always ringing. LendUp uses Twilio TaskRouter to make sure the right call gets to the right person programmatically.

LendUp Chooses TaskRouter

lendupproduct“We have customers with unique needs. We deal with customers who often time don’t have people to help them out. We pride ourselves on being able to help them, to support them and be available for them. By matching the right agents to the right people, we are able to do that faster and more effectively,” says Jake Rosenberg, CTO at LendUp.

Before LendUp discovered TaskRouter, they were already building an internal tool to manage calls more effectively. They wanted to intelligently route customers calls to different specialists by programmatically ascribing attributes to the call that tell TaskRouter where to send the call.

For example, if a customer needed to fill out an application over the phone, that call should go to agent A. A service queue should go to agent B. Prioritized customer calls should go to agent C. Using TaskRouter, LendUp can write their own call routing logic, and let TaskRouter do the heavy lifting.

“TaskRouter satisfied 100% of our needs,” says Joseph Moniz, Software Engineer at LendUp. “This was the fastest development timeline I’ve ever had.” Moniz and the LendUp team had about a week of development work, and then put their Twilio powered contact center solution through to testing and production.

“Using a system we built ourself, powered by TaskRouter, has enabled us to build a lot of operational efficiency,” says Moniz. With TaskRouter firmly in place at LendUp, they can spend less time manually directing calls, and more time directing their customers to better credit.

LendUp Helps Customers Personally, Runs Their Call Center Programmatically With TaskRouter

Using Bots To Route Customer Requests Based On Sentiment and Emotion

$
0
0

2016: the year where no strategy or vision pitch was complete without mentioning bots. 

You can’t watch a tech keynote, scroll through your newsfeed, or be anywhere online without reading how bots are replacing apps, or replacing humans.  

Assuming though for just a moment that we don’t turn our every human interaction, from wedding vows to childcare, into an AI driven chat based interaction… we have a question to answer: what is a realistic view of how companies could be using bots today? I’m particularly interested in the possibilities for using bots within a call center (But not as a replacement for humans – despite the hype we’re not a fully virtual society quite yet).

Sentiment driven routing

To explore these ideas, I built a call center prototype to look at ways to merge human and bot interaction together. I’ve been chewing on a few questions: Could you have customers chat with a bot first to better determine their intent, and even emotional state, and use that information to connect them to a better matched agent? Could you save the agent time by having the bot capture key information first and inform the agent when they take the interaction? What about handling self-service questions entirely automatically without ever passing the chat to a human agent?

My prototype handles inbound interactions coming in over both SMS and from Twilio’s new Facebook integration, all routed by TaskRouter. I also used Marketplace AddOns for details about the users texting in, along with Meya.ai for the bot platform, and Firebase. The code for this is all available in github, so you can follow along as we go through the architecture.

A customer messaging in ‘hey I could do with some help’ will get routed in a completely different way to someone messaging ‘You guys really suck I can’t believe you still haven’t fixed this’. And someone messaging ‘what are your opening hours?’ doesn’t need to be routed to an agent at all.

Customers messaging in first cause a task to be created in TaskRouter. The Task serves as the primary key for the entire lifecycle of the customer interaction. When the task is created, it sits in a queue waiting to be bot qualified, and my app server connects the messages back and forth with the bot platform. The customer first chats with a bot, which determines their intent and emotional state.

Sending messages related to unqualified tasks to the bot:

client.workspace.tasks(taskSid).get(function(err, task) {
   attr = JSON.parse(task.attributes);
   if (!attr.hasOwnProperty('bot_qualified')) {
     console.log("this task is not yet bot qualified");
     console.log("posting to meya with user id " + meyaUserID_string + " and text " + request.body['Body']);
     req
       .post('https://meya.ai/webhook/receive/BCvshMlsyFf').auth(meyaAPIKey).form({
         user_id: meyaUserID_string,
         text: request.body['Body']
       })
       .on('response', function(response) {
         console.log("got response from meya " + response);
       })
   } else {
     console.log("this task is already bot qualified");
   }
 });

The Meya bot platform uses an easy scripting interface to storyboard the interactions. It starts by gathering the intent of the first message, and then transitions between different states from there depending on what’s said – the sequence will flow through to the next state unless you specify a transition to a different state.


intents:
 misunderstood: help
 hi: hi
 how_are_you: how_are_you
 help: help
 whats_up: whats_up
 who_are_you: who_are_you
states:
 how_are_you:
   component: meya.text
   properties:
     text: I'm good! Thanks for asking!
   transitions:
     next: delay
 whats_up:
   component: meya.text
   properties:
     text: Oh we're just chilling.
   transitions:
     next: delay
 who_are_you:
   component: meya.text
   properties:
     text: I'm a bot, I will gather some information first and then pass you to an
       agent who can help
   transitions:
     next: delay
 hi:
   component: meya.random_text
   properties:
     responses:
     - Hi :)
     - Hello, there!
     - Howdy!
     - Bonjour.
 delay:
   component: al_delay
 help:
   component: meya.wit
   properties:
     text: How can I help you with British Exports?
     require_match: false
     token: <wit.ai token>
   transitions:
     angry: angry
     happy: happy
     needs_help: needs_help
     problem: problem
     service_question: service_question
     no_match: unsure_state
 angry:
   component: intent_checker
   properties:
     text: I'm really sorry. Would you mind if we chat a bit more and I can see if
       I can help make things better?
     emotion: angry
   return: true
 happy:
   component: intent_checker
   properties:
     text: I'm glad to hear it. Let me send you a free t-shirt to show our gratitude.
       :)
     emotion: happy
   return: true
 needs_help:
   component: intent_checker
   properties:
     text: I can definitely help you out. I'm going to need to ask you a few more
       questions.
     emotion: needs_help
   return: true
 problem:
   component: intent_checker
   properties:
     text: We'll get that fixed ASAP. One moment please.
     emotion: problem
   return: true
 service_question:
   component: intent_checker
   properties:
     text: You're asking the right person. Let me ask you a couple of questions so
       I can get you the answer you want.
     emotion: service_question
   return: true
 unsure_state:
   component: intent_checker
   properties:
     text: Sorry...let me pass you on to someone who can better help with that
     emotion: unsure
   return: true

When a bot gets an answer to the question ‘how can i help’, it uses Wit to determine sentiment. Wit is really easy to train from a data set of responses what the intent of the interaction is. The more you train it, the better is is at handling different variations of what the customer might say.


screenshot-2016-10-07-10-50-16

Once the bot has determined the intent, we’re ready to update the task attributes in TaskRouter to say that the task has been bot qualified, and mark their intent. In this case, it assigns each task to one of the following states: angry, happy, needs_help, problem, service_question, or unsure. To do this, I used the native Twilio integration available within the bot platform Meya.ai, so that my bot logic directly calls the update task API with the new attributes.

from meya import Component
import re
import json
from twilio.rest import TwilioTaskRouterClient

class IntentChecker(Component):
   def start(self):
       account_sid = <account sid>
       auth_token  = <auth token>
       client = TwilioTaskRouterClient(account_sid, auth_token)
       # read in the response text, and default to empty if invalid or missing
       text = self.properties.get('text') or ""
       # meyaUserID=JSON.loads(self.db.user.user_id)
       meyaUserID = self.db.user.user_id.split('@@')
       taskSid=meyaUserID[2]
       task = client.tasks("WS056355824815f89c7cc46e5d8cacaf20").get(taskSid)
       task_attributes= json.loads(task.attributes)
       task_attributes['bot_qualified']='true'
       task_attributes['bot_intent']=self.properties.get('emotion')       
       print task_attributes
       attribute_string=json.dumps(task_attributes)
       task = client.tasks("WS056355824815f89c7cc46e5d8cacaf20").update(taskSid,attributes=attribute_string)
       message = self.create_message(text=text)
       return self.respond(message=message)

With the task updated, TaskRouter then moves the task into the appropriate queue so the best agents can handle the query. The gif below shows a realtime visualization of a TaskRouter workspace (code for this is also in github).


7OgV6Pld8gXyR34ZRKI9uQKtjWQ8Xywd6bM9LYuh83Tj0pansfKi2eF0oWTFiraxhjJG-w4JL3-7obiFN0z94-6VYBaC5YGRo5sI5QC4KNWG5GakGEQDVLgh_UTGiXsIoVdOM08-

Once a task is bot qualified, and a suitable agent becomes available based on the determined intent, TaskRouter will push a reservation request to the agent. At this stage the agent gets to see all of the conversation history so they can get up to speed immediately and continue the conversation.

One of the key benefits of using messaging for customer service is that agents can handle multiple messaging interactions simultaneously. So I used the new multitasking feature of TaskRouter to be able to specify how many tasks the agent can handle concurrently. As you change capacity of the worker, they get additional task reservations:

app.get('/updateCapacity', function(request, response) {
 // This function uses the TaskRouter multi-tasking API to change concurrent task capacity
 var options = {
   method: 'POST',
   url: 'https://taskrouter.twilio.com/v1/Workspaces/' + workspaceSid + '/Workers/' + request.query.workerSid + '/Channels/default',
   auth: {
     username: accountSid,
     password: authToken
   },
   form: {
     Capacity: request.query.capacity
   }
 };
 console.log(options);
 req(options, function(error, response, body) {
// snip code that goes on to handle request…
});
 response.send('');
});


multitasking

And finally I also used Marketplace AddOns to get the name and address of folks texting in:

try {
             var addOnsData = JSON.parse(request.body.AddOns);
             friendlyName_first = addOnsData['results']['nextcaller_advanced_caller_id']['result']['records'][0]['first_name'];
             friendlyName_last = addOnsData['results']['nextcaller_advanced_caller_id']['result']['records'][0]['last_name'];
             address_street = addOnsData['results']['nextcaller_advanced_caller_id']['result']['records'][0]['address'][0]['line1'];
           } catch (err) {}
           myFirebase.child("profiles").child(newTaskResponse.sid).set({
             'first_name': friendlyName_first,
             'last_name': friendlyName_last,
             'address_street': address_street,
             'message_type': 'sms',
             'profile_pic': 'img/unknownavatar.jpeg'
           });

So now we have a customer service solution where users can message in through SMS or Facebook, and based on what they say they need help with (and how they say it), they will get routed to the best qualified agent. The agent will have all the context of the conversation so far, and details about the customer from the Marketplace AddOns lookup of their phone number. The agent can choose how many customers they want to handle concurrently using the new multi-tasking capability of TaskRouter.

You can hear me talk more about this demo in this video from SIGNAL. All my code is available in github. The back end is all Node, the front end uses Foundation, and the bot platform used was meya.ai (who are phenomenally helpful, nice people). Disclaimer: I hadn’t coded anything in ten years, and had never used Node or any of these tools before, so in no way is this production code. Pull Requests welcome!


Using Bots To Route Customer Requests Based On Sentiment and Emotion

Introducing Multitasking for Taskrouter

$
0
0

Today we’re excited to introduce a new feature for TaskRouter – multitasking. Before we get into multitasking, a quick refresher: TaskRouter is a skill-based routing engine, designed for routing work such as customer support interactions to the best matched agent. Multitasking extends what you can build with TaskRouter by allowing workers to handle multiple tasks concurrently.

TaskRouter can be used for many different solutions, but the most common use case is as the beating heart of a contact center – pumping the right task to the right place with the right priority. When those tasks are voice calls, you typically only want one agent to work on one task at a time. But we increasingly see TaskRouter powering multi-channel contact centers. For example, the global bank ING use TaskRouter to power their contact center for customer service in 17 different countries. TaskRouter routes not just voice calls, but messaging sessions as well.

When customers contact a company through messaging, those interactions are well suited to being handled in parallel. Agents can often handle chatting with 2 or 3 different customers at any given time. These interactions are asynchronous in a way voice calls are not.

In fact, we often see customers building solutions which suggest to callers on hold in a queue to hang up and message their query instead – on average that approach pivots about 40% of call traffic over to messaging, where it can be handled in parallel with other interactions, making agents more efficient and allowing the company to flatten out the spikes in load.

TaskRouter multitask is designed to make this sort of solution easy to build and scale. Tasks belong to one of multiple different Task Channel types (Voice, Video, IP Messaging, SMS). Each worker within TaskRouter can then be configured as to how many tasks of each type they can handle concurrently. So for example if you build your chat solution using IP Messaging, you can say that they can handle 3 IP Messaging sessions with the following API call:

$ curl -X POST https://taskrouter.twilio.com/v1/Workspaces/{WorkspaceSid}/Workers/{WorkerSid}}/Channels/ipm
-d 'Capacity=3&Available=true'
   -u '{account_sid}:{auth_token}'

Sometimes, you may want to specify that workers cannot handle tasks of one type if they are busy with a task of another type. To do this you use Target Worker Expressions, which allow you to specify matching workers based on the multitasking specific pre-defined attributes. These can be used from either the TaskQueue or the Workflow.

worker.channel.<task type>.available_capacity_percentage
worker.channel.<task type>.configured_capacity
worker.channel.<task type>.assigned_tasks

For example, you may want to see that workers can handle one voice call or three messaging sessions – but if they’re on a voice call then they can’t handle any new messaging sessions. Using these attributes you can write expressions to route tasks of different types to workers based on their configured and consumed capacity.

$ curl -X POST https://taskrouter.twilio.com/v1/Workspaces/{WorkspaceSid}/Workers/{WorkerSid}}/Channels/ipm
    -d 'Available=false'
    -u '{account_sid}:{auth_token}'

To get started with TaskRouter multitasking, check out the docs or the sample code from my prototype sentiment-based-routing contact center. If you’re using TaskRouter through our Helper Libraries, you will need to use the next generation ‘yoyodyne’ helper libraries in order to access Multitask.

We’ve seen more and more companies build contact centers on top of TaskRouter. We’re excited to see how multitasking can make it even easier to build multi-channel contact centers. We can’t wait to see what you build.

Introducing Multitasking for Taskrouter

Building an IVR with no code by using TaskRouter as a state machine

$
0
0

The other day, a customer showed me their Twilio-powered IVR. Specifically, the code that tracks a caller’s progress through the IVR. They built an IVR state machine that solved some of the common challenges many run into when building a complex, multi-stage IVR:

  • They wanted a generic, re-usable solution to keep track of where each caller is within the overall IVR experience each time you get a webhook, rather than hard-coding the state tracking to the current configuration of the IVR
  • They wanted for people to be able to change the configuration of the IVR  without making code changes.
  • They wanted a JSON based syntax for defining an IVR workflow so that they could tie it to a visual IVR flow builder which automatically creates the right JSON.

Their demo sparked this thought – at its heart, TaskRouter is a state machine.

I built an IVR abstraction on top of TaskRouter to function as a backbone, and solve the typical challenges of tracking state.

I found you can build an IVR with nothing but TaskRouter and TwiML Bins.

What I built uses the TaskRouter workflow syntax for defining the flow between different states, and TwiML Bins for hosting the XML associated with each state. This post shows you the architecture of the backbone hack. Grab it here on GitHub

How it works

Each call coming in to the IVR is represented as a task within TaskRouter – the task is created the first time the call hits my application server, and from then on the same Task is used for each subsequent webhook, by looking up the Task from the CallSid.

Each TaskQueue represents a state within the IVR – i.e. a spoken menu and a DTMF

<Gather>
  request for the caller to specify where they want to go next. As the caller navigates the IVR, the Task is updated with what state they just left, and what DTMF digits they entered – and then the TaskRouter workflow expression dictates which TaskQueue state the call moves to next – and therefore what TwiML should be returned to Twilio.

app.post('/initiateivr', function(request, response) {
    var attributesJson = {};
    checkForExistingTask(request.body['CallSid'], function(returnedTask) {
        if (!returnedTask) {
            attributesJson['CallSid'] = request.body['CallSid'];
            attributesJson['From'] = request.body['From'];
            attributesJson['To'] = request.body['To'];
            createTask(attributesJson, function(returnedTask){
                response.send(getTwimlfromTwimlBin(returnedTask));
            });
        }
        else {
            attributesJson['exited_node'] = returnedTask.task_queue_friendly_name.split(':')[0];
            attributesJson[returnedTask.task_queue_friendly_name.split(':')[0] + '_entered_digits'] = request.body['Digits'];
            updateTask(attributesJson, returnedTask, function(updatedTask){
                response.send(getTwimlfromTwimlBin(updatedTask));
            });
        }
    });
});

In order to return the right TwiML, each IVR State (TaskQueue) is correlated with a TwiML Bin which hosts the TwiML for that state. When Twilio webhooks to my application server seeking instructions for what to do with the call, my application server looks up what TaskQueue the Task is currently in, and then returns the TwiML from the TwiML Bin associated with that TaskQueue. It does this based on the name of each TaskQueue being of the form

<Friendly_name>:<TwiMLBin Sid>
 .

When a caller enters digits from a

<Gather>
  in that TwiML, before looking up the TaskQueue, my code first updates the task with an attribute containing the digits entered, and the last state left – so that TaskRouter re-routes the Task to the new TaskQueue based on this new information. So for example if a
<Gather>
  in the state “first_state” of an IVR led to digits being entered, those digits will be available within an attribute on the Task as
first_state_entered_digits.
 

attributesJson['exited_state'] = returnedTask.task_queue_friendly_name.split(':')[0];

attributesJson[returnedTask.task_queue_friendly_name.split(':')[0] + '_entered_digits'] = request.body['Digits'];

updateTask(attributesJson, returnedTask, function(updatedTask){

   response.send(getTwimlfromTwimlBin(updatedTask));

});

In addition, TaskRouter will pass all of the Task’s current attributes to the TwiML Bin, so any of them can be read aloud by the TwiML by simply including the attribute name in the form

{{task_<attributename>}}
 . E.g:

<?xml version="1.0" encoding="UTF-8"?>

<Response>

 <Say>Thank you for confirming your ZIP code. You entered {{task_first_state_entered_digits}}</Say>

</Response>

My application server will also automatically insert spaces between any sequence of numbers, or an E164 number before including it in the parameters to the TwiML Bin, in order to have Twilio pronounce it correctly. This is why all attributes are referenced with a task_ prefix from the TwiML Bin, so you can take advantage of this automatic number formatting.

An example flow

So to piece together the different parts, let’s walk through a basic IVR example where a caller dials in, hears a menu, presses 1, and then hears a different menu. In this scenario:

  • When the call first comes in, the application server receives a webhook from Twilio. It verifies this is a new call and creates a task associated with it
  • When the task is created, Twilio returns the TaskQueue it has been routed to based on the workflow. My application server then fetches the TwiML from the TwiML Bin associated with that TaskQueue
  • The application server returns that TwiML to Twilio in response to the initial webhook. This TwiML includes a
    <Gather>
      requesting DTMF digits, which once fulfilled will webhook to my application server again.
  • When the webhook for the completed
    <Gather>
      comes in, my application server finds the correlating Task based on CallSid. It then updates the attributes of the task with the dialed digits and the state the Task just exited.
  • Twilio responds to that task update with the new TaskQueue (state) which the task has been routed to based on the new attributes. My application server retrieves the TwiML Bin associated with that new TaskQueue, and responds to the webhook for the completed
    <Gather>
      with that TwiML.


Building IVR workflows in TaskRouter

So now we have the framework for our IVR flow builder, everything else can be configured with no code, using only the workflow.

So for example, moving from the first state to the second state if the digit ‘1’ is pressed is as simple as:

"filters": [
     {
       "targets": [
         {
           "queue": "WQ77fc8f0cc8346e5ff37ac82dc944e141"
         }
       ],
       "filter_friendly_name": "Send calls from the first state to the second state if they entered 1",
       "expression": "exited_state=='first_state' AND first_state_entered_digits ==1"
     }
   ],

And of course because it’s built on TaskRouter all the pre-defined attributes can also be used, so to have a different IVR menu for inside business hours is as simple as:

"filters": [
           {
               "targets": [
                   {
                       "queue": "WQ57cab415732dec475f600c75eab44cc9"
                   }
               ],
               "filter_friendly_name": "Business Hours Menu",
               "expression": "(taskrouter.dayOfWeek IN ['Mon', 'Tue', 'Wed','Thu', 'Fri']
                               AND taskrouter.currentTime > 800
                               AND taskrouter.currentTime < 1730)
            }
       ],

After the IVR

Once the caller has reached a ‘leaf state’ in the IVR where it is ready to be assigned to an agent, it is simply a case of using the workflow to move that to a TaskQueue which has workers matched to it.

Alternatively if you wanted to move the task to a different workspace in order to keep TaskQueues and metrics separate, you could maintain an attribute within the task which is a JSON blob of all task attributes, and then

<Enqueue>
  the task into a new workflow and include those attributes.

A foundation for building complex IVRs?

I’m excited about the potential of this, and keen to hear your thoughts as to whether this approach would be worth us investing in productizing. You can email me at al@twilio.com. To get started with TaskRouter, read the docs.

The back end for this is all Node, making heavy use of callbacks for dealing with the asynchronous nature of this.

Disclaimer: In no way is this production quality code. Pull Requests welcome!

Building an IVR with no code by using TaskRouter as a state machine


Introducing Twilio Flex: A Fully Programmable Contact Center Platform

$
0
0

At Twilio we often say, “We can’t wait to see what you build.” That’s because the communications building blocks we provide are only as powerful and innovative as the applications that developers create with them. It’s these builders who have shown us just how far our APIs can be taken, from 3D mapping with AR and IoT potty training, to a life-saving text line and data-driven debt relief.

But there are still some areas that remain a challenge for developers to build better communications experiences using software. Chief among them: the contact center.

That’s why we’re so excited today to introduce Twilio Flex, the first cloud contact center application platform that’s programmable at every layer of the stack.

We’re excited because…well, when’s the last time you called in to a customer support line, dialed dozens of digits, got routed through an infinite loop of automated messages, and thought to yourself, “Wow, that was an awesome experience. I love this business even more now.”? Probably never.

Why is it so hard for contact centers to keep up with changing customer needs and preferences? Existing contact center technology forces businesses to choose between customization and speed. Legacy premise-based contact centers let you customize the experience you want to deliver, but require costly professional services and lengthy cycles to build and iterate on. By contrast, SaaS contact centers offer quick deployment, but this comes at the cost of customizability and limited scale.

And neither of these approaches offer developers the ability to build better outcomes for their contact center.

Twilio Flex introduces a new approach: the contact center application platform. It is instantly deployable and designed to bring the power of programmability to this next frontier of customer engagement — the contact center. We developed Flex based on ten years of learning how our customers have built their contact centers with an API approach.

The application platform provides an entirely new way to build fully programmable communications solutions. Just as APIs allow you to call up logic that has already been written and tested, an application platform allows you to do this on a much larger scale (like spinning up a fully-functioning omnichannel contact center) — with the same skills it takes to use an API.


What do we mean by fully programmable?

Let’s break it down.


Channels
Flex is instantly deployable with a suite of channels baked right into the UI that you can choose to add with a few clicks in the provisioning wizard. Want to add your own custom channels? You can do that, too.

Flex UI
The Flex micro-component architecture is built on a modern React and Redux core, and is designed to let you rip it apart, and add, remove, or customize anything while still feeling native. Configure the look and feel, brand it, or, if you don’t like the options that come out of the box, get into the code and change any pixel on the screen.

Interaction Workflows
Want to build something more intuitive than an infinitely looping, frustrating IVR? Flex uses Twilio Studio, a visual workflow editor so you can easily control the flow of each interaction with a simple drag and drop mechanism. Studio’s API endpoints also let you integrate data from your own custom sources to provide contextual intelligence to agents. And you can add your own widgets to Studio’s communication flow using a NodeJS-based serverless environment.

Intelligent Routing
Flex incorporates Twilio TaskRouter so you can programatically route the right call to the right agent. Integrate contextual information from your own data sources to build custom logic with TaskRouter to build, test, and optimize your routing.

Integrations
Flex is built for two-way integration. Send and receive data from CRM, WFO, and WFM tools — whether they’re homegrown or from our growing marketplace of third-party custom integrations — to manage any customer interaction using a single interface.

And because Flex is built on our GDPR-compliant, ISO 27001-certified communications platform that powers 40 billion interactions a year worldwide, it is secure and massively scalable, capable of supporting up to 50,000 agents per contact center.

Next steps

Twilio Flex is now in Preview while we work with a small pilot group of users as we round out the feature set and developer experience.

Want to be the first to get updates about Twilio Flex? Sign up at www.twilio.com/flex.

In the meantime, check out this sneak peek of Flex, as well as some resources to start prototyping key contact center elements with a few of the components that are available now:

React/Redux
Tutorial: Intro to React

TaskRouter
Video: How to Build a Call Center with TaskRouter

Studio
Video: How To Build an IVR System with Twilio Studio


Introducing Twilio Flex: A Fully Programmable Contact Center Platform

How to Build A Custom Call Center with Twilio Studio and TaskRouter

$
0
0

With Twilio Studio and TaskRouter you can set up a call center in less than 1-2 hours. This post will walk you through the steps to receive calls on your Twilio phone number and have the callers put into a call queue. The callers will listen to music while the call center application arranges an agent to take their call. Agents will use their web browser, on their computer, to manage their status: offline and available to accept calls.

When a caller is added into the queue, TaskRouter creates a reservation and then asks an agent if they will accept the call. The agent has the option to Accept and be connected with the caller, or to Reject the call. If the call is rejected, TaskRouter will ask the next available agent.

When the agent accepts the call, TaskRouter will contact the agent based on the agent’s TaskRouter configuration. For example TaskRouter maybe configured to dial the person’s mobile phone number or contact the agent using Twilio Client, which is built into the sample Call Center application. Twilio Client allows an agent talk to callers using their computer with a microphone and headphones (or built in microphone and the computer’s speakers).

Implementation overview:

  • Create and configure a TaskRouter workspace.
  • Use Studio to create an IVR to welcome the caller and let them know an agent will be with them shortly.
  • Deploy an agent application to the website provider, Heroku. The application allows agents to manage their available status, and optionally, to talk to the callers.

Create and Configure a Call Center

Start by creating a TaskRouter Workspace that will contain the required components: TaskQueues, Workflows, and Workers. In the Twilio Console, go to the TaskRouter dashboard:
https://www.twilio.com/console/taskrouter/dashboard 
Set the Properties Workspace Name to, Seagull.
Click Save.
On the left menu, click Settings.
Note, Workspace SID, for example: WS40e4826e3a7b33b140b3c4d63b853e44. Add the SID into a text file for later reference.

Create a Caller TaskQueue

A TaskQueue holds callers waiting to be connected to an agent. A TaskQueue has a name, for example support, and is configured with Worker attributes, such as support. If a caller wants to talk with a support agent (Worker), they are put into the support queue.

In Overview, click Create new TaskQueue.
Set:

  • Properties TaskQueue Name to, support.
  • Max Reserved Workers: 1
  • Target Workers: skills HAS “support”

Click Save.

Create a Workflow

A WorkFlow manages task reservations. A WorkFlow has a name, for example support, and is configured with task attributes such as (selected_product=="support"), and has a queue assigned; in this example, the support TaskQueue. When the TaskRouter Workspace is given a task with the attribute, selected_product=="support", TaskRouter checks the assigned queue, support, to get the required Worker attributes. Then TaskRouter makes a reservation and asks the available agent to Accept the call. Then follow these steps to proceed with the Workflow configuration:

  1. On the left menu, click Workflow.
  2. Click Create new Workflow.
  3. Set the Properties, Friendly Name to, support.
  4. Set the Assignment Callback, Task Reservation Timeout to, 10. This gives an agent 10 seconds to accept a call reservation.
  5. Click Save.
  6. Note, at the bottom the default TaskQueue is support: “Default TaskQueue: support.”
  7. On the left menu, click Workflow.
  8. Add the support workflow SID, example: WW999952bd6c48b9159592ea2c291b7e42, into your SID text file, as it’s used when configuring your Studio IVR.

Create a Worker

Workers are agents. They have a name, attributes to match at least one TaskQueue ("skills":["support"]), which they are subscribed to, and their status. The status can be set in Console or managed by the agent in the agent web application.

  1. Create a Worker. In the left menu, click Workers.
  2. Click Create new Worker.
  3. Set the Properties Worker Name to, Jonathan.
  4. Set the Attributes to, {"skills":["support"],"contact_uri":"+12223331234"}. Replace 12223331234, with your phone number.
  5. Click Save.
  6. Note, at the bottom is the message, “Subscribed TaskQueues: support.”

The above uses a phone number. An option is to use the Twilio Client built into the agent application. To use the Client instead of a phone number, do the following:
On the left menu, click Workers. Note, Worker: Jonathan, has SID, example: WSc1241db79a87910a35f3ded642a7fcdc.
Click Jonathan. Set Attributes to use Jonathan’s SID as the Twilio Client id. Example: {"skills":["support"],"contact_uri":"client:WSc1241db79a87910a35f3ded642a7fcdc"}
The contact_uri is used to connect Jonathan to callers.

Configure an Agent Worker Activity

To use the sample agent application, add a WrapUp Worker activity. This activity happens after an agent finishes their call. For example, the agent may need to make call notes before becoming available again.

  1. On the left menu, click Activities.
  2. Click the icon, Create new Activity.
  3. Set the Properties Activity Name to, WrapUp.
  4. Click Save.
  5. On the left menu, click Activities.

The new activity is list with the other activities:

Offline    WA92e4214b00f75ac0fe46f7e062f5b475        false
Idle       WA1acd4b81d4c5e49a21154302212c3460        true
Busy       WA2a68f4da471bfc61b6907ca784cb8d5e        false
Reserved   WA80aa14074968999ebf6b5b3cb1d21ddd        false
WrapUp     WA5a2ea75390a3246f3875e907864611f1        false

Create an IVR Studio Flow to Manage Incoming Calls

Create a Support IVR that says a message and the puts the caller into the TaskRouter support TaskQueue.

Go to the Twilio Console Studio tool: https://www.twilio.com/console/studio
Create a new flow, Friendly name: Enqueue Caller.

Drag a Say/Play widget onto the flow panel, under the Trigger. Connect the Trigger’s Incoming Call link to the Say/Play widget. Set the widget name to: say_play_Welcome. Set the Text to Say to, Welcome to Support. I will put you on hold while I find you an agent.

Drag an Enqueue Call widget onto the flow panel.
Set the widget name to: enqueue_to_Support. Set Workflow SID to your support workflow SID, which begins with the letters, “WW”. Set Queue or Taskrouter Task to: TaskRouter Task. Set the Task Attributes (JSON) to: {"selected_product" : "support"}.

Your Studio flow will look like this flow:

Buy and Configure a Twilio Phone Number to Call the Support IVR

In the Console, buy a phone number then go to your Twilio phone number’s configuration page. Set Voice & Fax, A Call Comes In, to: Studio Flow : Enqueue Caller (see screen print below). Click Save.

Test

Use a phone to call your IVR Twilio phone number. You will hear the welcome message and then be put into the TaskRouter support TaskQueue where you will hear music playing. If you hear music, the test is a success and you can hang up.

Implement the Agent Web Application

For this part, you will need an Heroku account. Once you have an account and are logged into the Heroku dashboard, go to my GitHub application repository:
https://github.com/tigerfarm/owlcc 
Note, as an alternative, in the repository’s README.md file, I have included the steps to run the application from your localhost.
To deploy to Heroku, scroll down the GitHub README.md file, and click, Deploy to Heroku, or just click it here:

You will be prompted for an app name. The name needs to be unique. Enter, your name cc, example: davidcc. Click Deploy app. Once the application is deployed, click Manage app. Set Heroku project environment variables by clicking Settings. Click Reveal Config Vars. Click Add, and add each of the following key value pairs:

  • ACCOUNT_SID : your_Twilio_account_SID
  • AUTH_TOKEN : your_account_auth_token
  • WORKSPACE_SID : your_TaskRouter_workspace_SID

Test the Application

Use your web browser to go to your Heroku’s URL, example:
https://davidcc.herokuapp.com
The Owl Call Center home web page is displayed.

  1. Click Agent list. Your Worker agent and their status is displayed.
  2. Click the agent’s name. The agent’s call center desktop is displayed.
  3. Click Go Available, and the message, Worker activity changed to: Idle, is displayed.
  4. Click Go Offline, and the message, Worker activity changed to: Offline, is displayed.
  5. Click Go Offline. Have your agent status as offline before starting the next test.

Test the Call Center

Use a phone to call your Twilio phone number. The Studio IVR will answer and put you on hold. While listening to music, go to your agent browser. Click Go Available. If you are using the Twilio Client option, you will be prompted to allow access to your microphone. Click Allow. You, as the agent, are now connected to the caller. If you are using a phone number for the agent, that phone number will receive a phone call.

You, as the agent, are now connect to the caller, who is from the support queue.

Check the voice call logs:
https://www.twilio.com/console/voice/logs/calls

What’s Next?

You have a Twilio phone number and an IVR which accepts calls that are handed off to TaskRouter. TaskRouter queues the calls and arranges an agent for each call. Your agents have an application to manage their availability status and take calls using their computer, headphones and mic. In other words, you have a functioning Call Center.

Next, ramp up. In your TaskRouter Workspace use the Twilio Console to add more workers, and add another queue to manage, say, sales calls. Build out your IVR with Studio, use MP3 sound files and add options for each of your queues. Read up on more TaskRouter features and add where required, such as timeout and escalation logic. If, after a specified amount of time, no agent is available on one queue, fall over to another queue.

If you have HTML and graphic skills, brand your Owl Call Center application to use your own company’s name, logo, and colors. Since you have followed this blog, your website uses Heroku or you’re running it on your localhost computer. You can upgrade your Heroku account or deploy your application to your company website.

Get others involved in testing. When your setup is better than your current system, move your Call Center into production, advertise your new company Twilio phone number and receive customer calls. Good luck!

How to Build A Custom Call Center with Twilio Studio and TaskRouter

Viewing all 10 articles
Browse latest View live


<script src="https://jsc.adskeeper.com/r/s/rssing.com.1596347.js" async> </script>